Ever attended a work meeting that left you no wiser about the tasks you were assigned or what consensus was reached? We've all been there, particularly when lots of people are talking all at once, questions go unanswered, or a brief's deadline isn't clear.
Both productivity and clarity often take a hit. (There's nothing worse than having to schedule another meeting to talk about that first meeting.)
So instead of chasing down the person taking notes, use Zapier's integration with OpenAI (makers of ChatGPT) to save the day. You can create automatic workflows—what we call Zaps—that prompt GPT-3 to create meeting summaries from your notes and send them to your team's Slack channel.
You can even use the AI to correct any spelling mistakes, include specific next steps for each team member, and call out any unanswered questions that need addressing.
This workflow requires a multi-step Zap, which is available on a
paid Zapier plan or during a free trial. Learn more about multi-step Zaps.Create meeting summaries with GPT-3
Zapier lets you create automated workflows called Zaps, which send your information from one app to another. You can create your own Zap from scratch without any coding knowledge, but we also offer quick templates to get you started.
If you'd like to start with a template, click on the Zap template below, and you'll be taken to the Zapier editor. You'll need to create a Zapier account if you don't already have one. Then, follow the directions below to set up your Zap.
Note: We recommend creating a meeting summary from your meeting notes instead of the video transcript from your meeting recording due to current limitations with GPT-3. OpenAI currently doesn't allow users to summarize transcripts that surpass a certain word count without splitting the text, as ChatGPT has a 4,000 token limit. Unless you have a very short meeting calls, you'll likely hit your limit trying to summarize most meeting transcriptions.
Before you begin
Make sure you set up an OpenAI account first, which is free to create. Once you've opened your account, generate your API key in the settings tab.
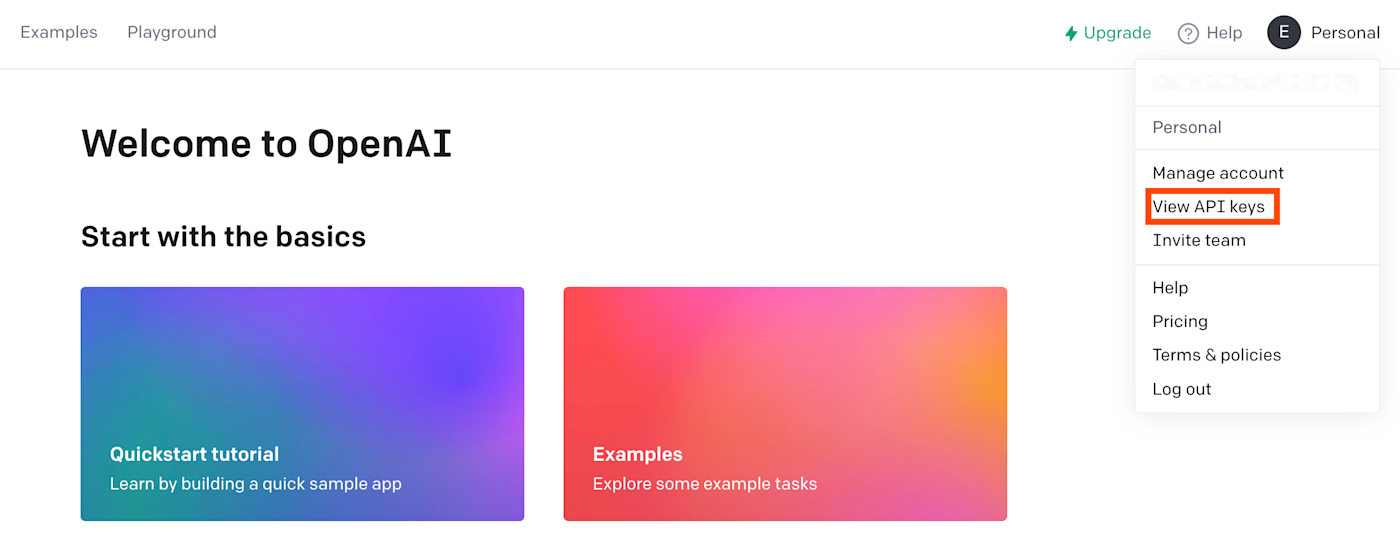
Remember to copy the key. You'll need this API key later when connecting your OpenAI account to Zapier.

Want to build GPT-3-powered apps for your clients or coworkers? Zapier's new Interfaces product makes it easy to create dynamic web pages that trigger automated workflows.
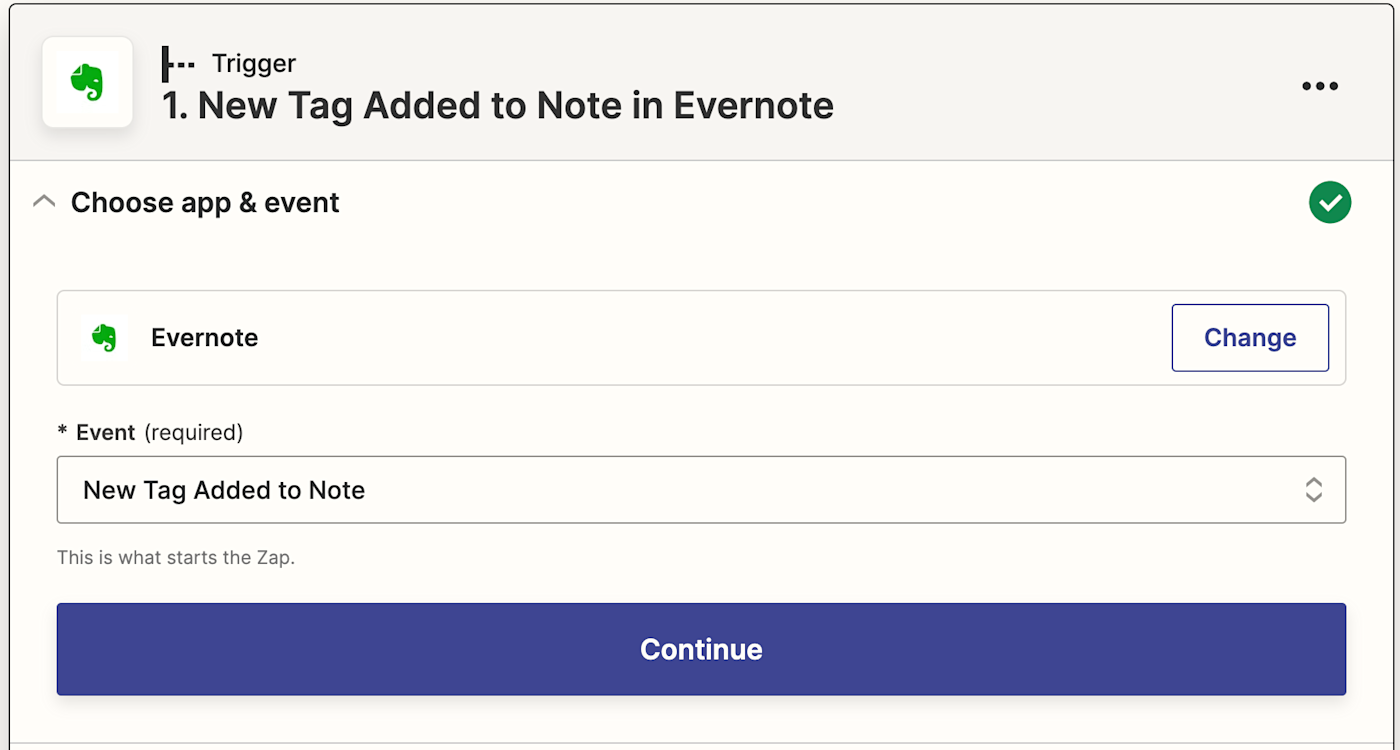
Set up your Evernote trigger
First, set up your trigger—the event that starts your Zap. Select Evernote for your trigger app and New Tag Added to Note for your trigger event.
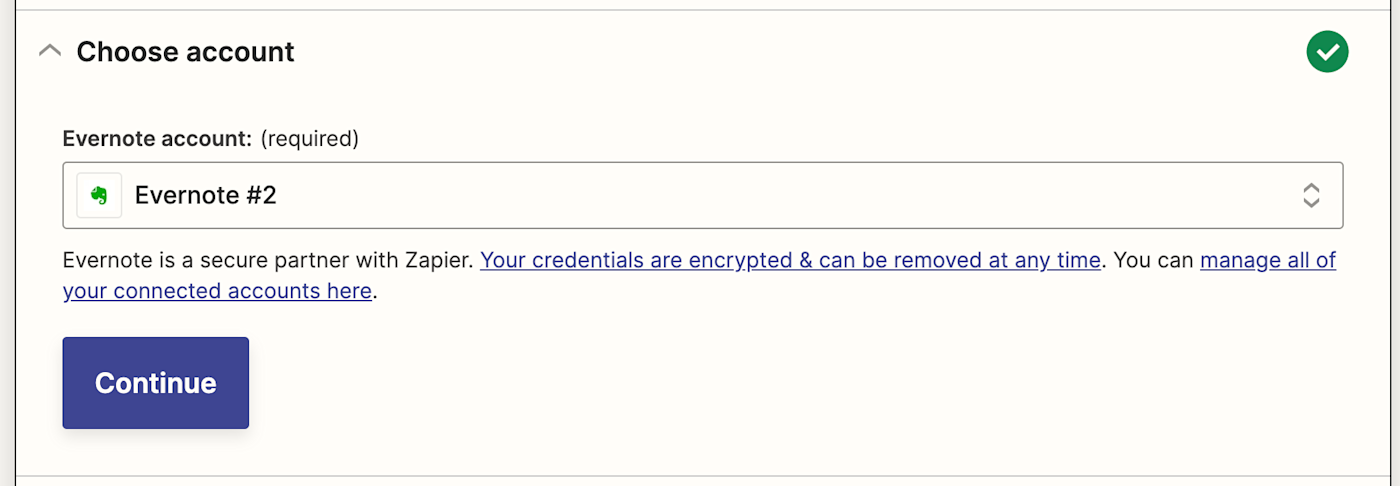
If you haven't already, you'll be asked to connect your Evernote account. Click on Choose an account… and either select an account from the dropdown menu (if you've connected Evernote to Zapier before) or click + Connect a new account.
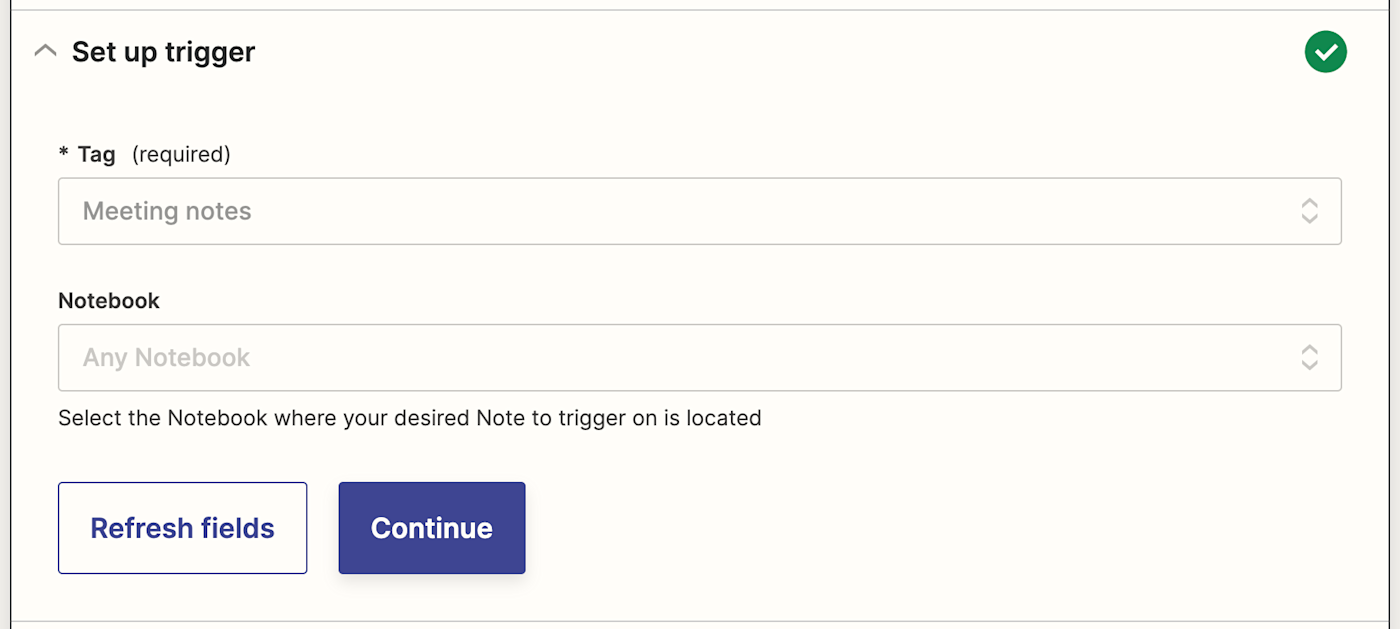
Click Continue. Next, select which tag you want to collect your meeting notes from.
Click the dropdown menu to see the tags available in your connected Evernote account. In this instance, we've set up a tag called Meeting notes so that whenever we add this tag to a note, it will set off the Zap. Now, select your tag. (If no tag is selected, the Zap will trigger on all notes.)
Click Continue.
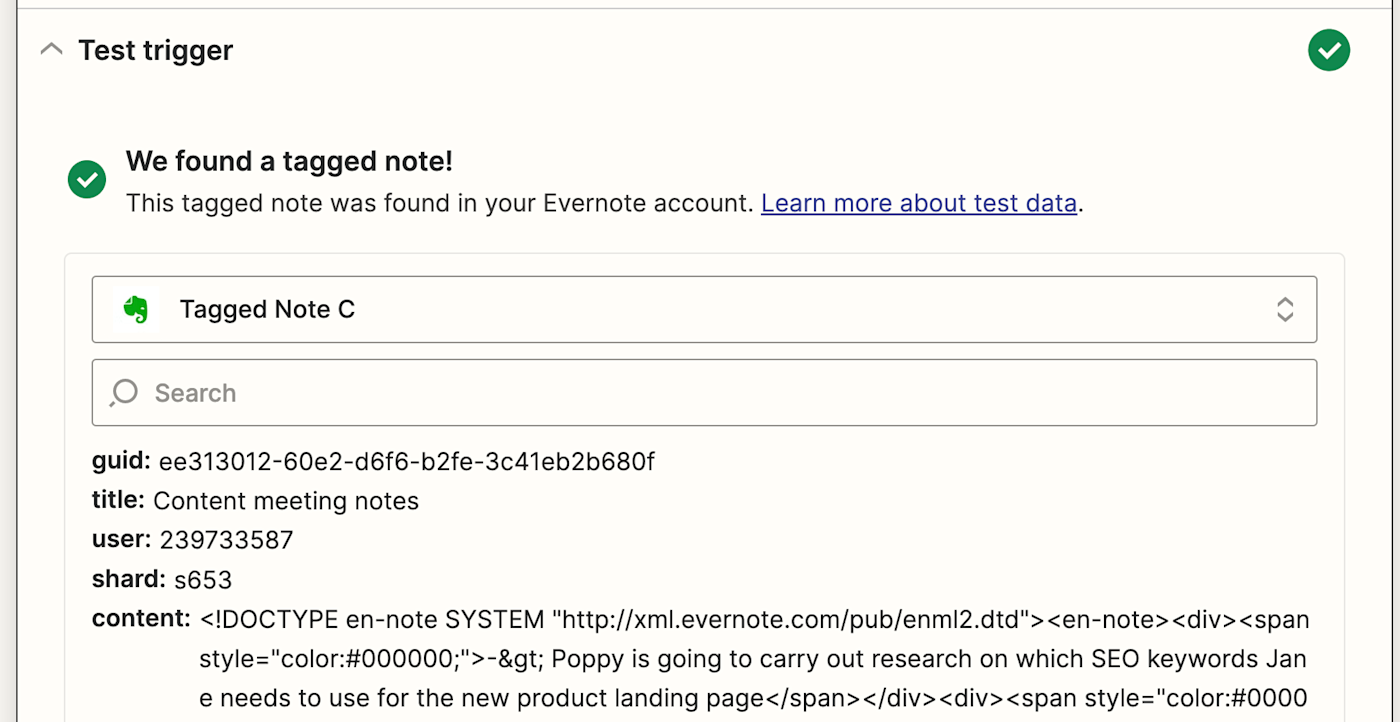
Now, you need to test your trigger. Zapier will find a recent note with the tag you added. This will be used to set up the rest of your Zap.
If you don't have any notes, add a sample note and tag it appropriately, then test your Zap.
Click Test trigger. It will pull in the sample note with the right tag. Once you see that your trigger is working correctly, click Continue.
Set up your OpenAI action
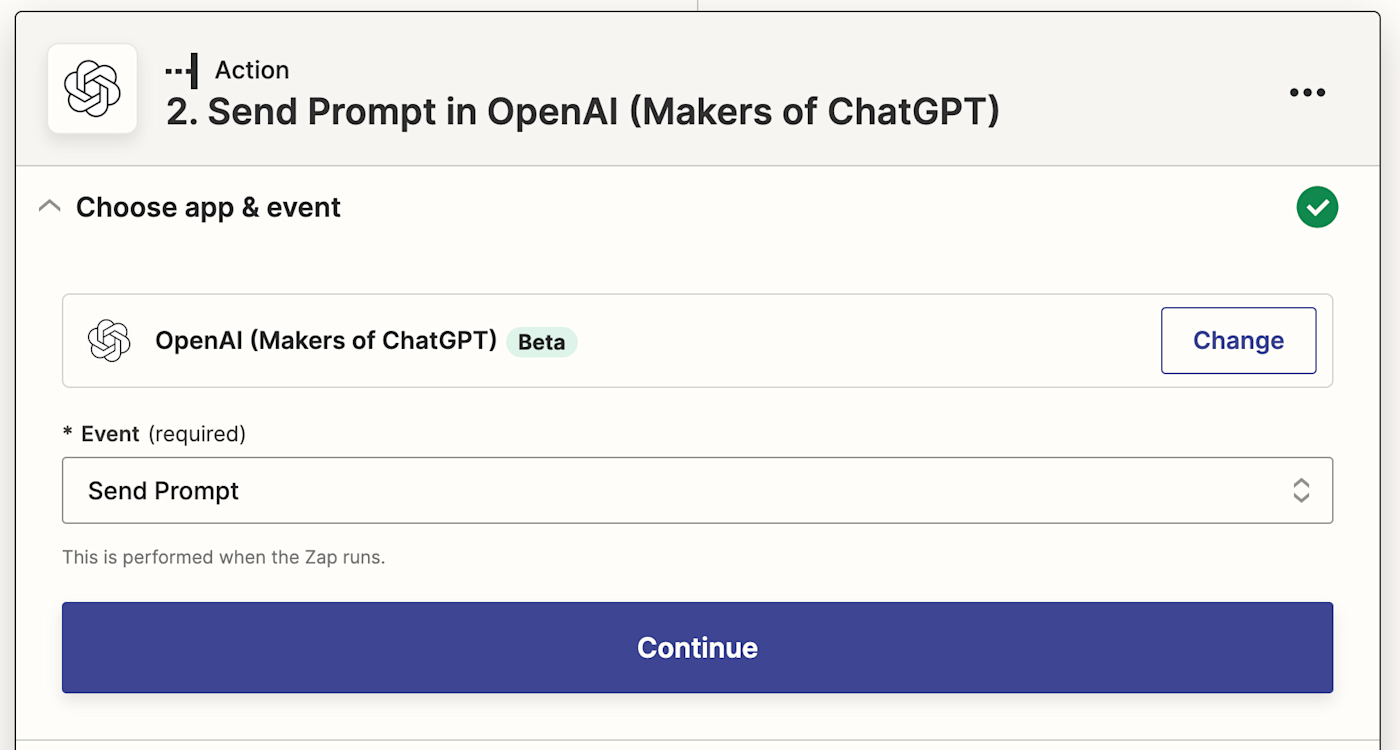
Now let's set up the action—the event your Zap will perform once it's triggered. Select OpenAI as your action app and Send Prompt as your action event. Click Continue.
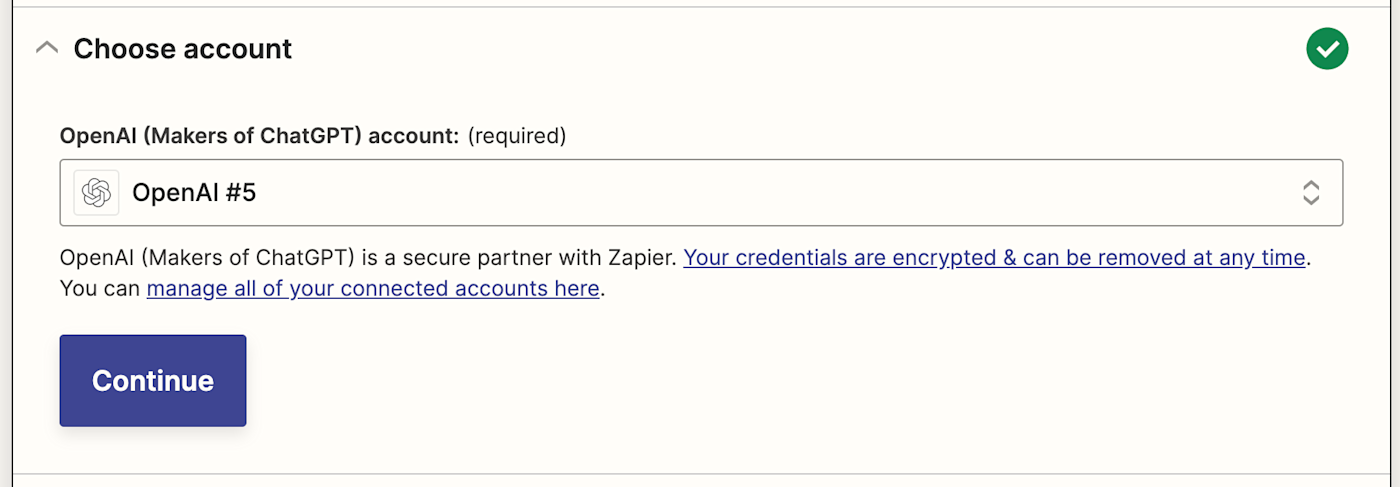
Then, if you haven't already, you'll be asked to connect your OpenAI account to Zapier. Click on Choose an account… and either select an account from the dropdown menu (if you've connected OpenAI to Zapier before) or click + Connect a new account, then click Continue.
Next, you'll be asked to insert your OpenAI API key, which you copied earlier.
Then, you need to tell your Zap how to generate a summary of your meeting notes.
You can pull in data from your Evernotes by clicking inside any empty field where you want the data to go and selecting an option from the Insert Data dropdown menu. This includes the AI model, prompt, temperature, and maximum length.
The most important part of this setup is your prompt. In the Prompt field, write out what you want the AI to write. In this instance, our prompt is: Can you create a quick summary of my meeting notes and also include specific next steps for each person in a separate list of bullet points? You should also correct any grammatical mistakes and call out if there are any unanswered questions.
Learn more: How to write an effective GPT-3 prompt
For the meeting contents, we'll pull in the meeting note text from the sample the Zap selected.
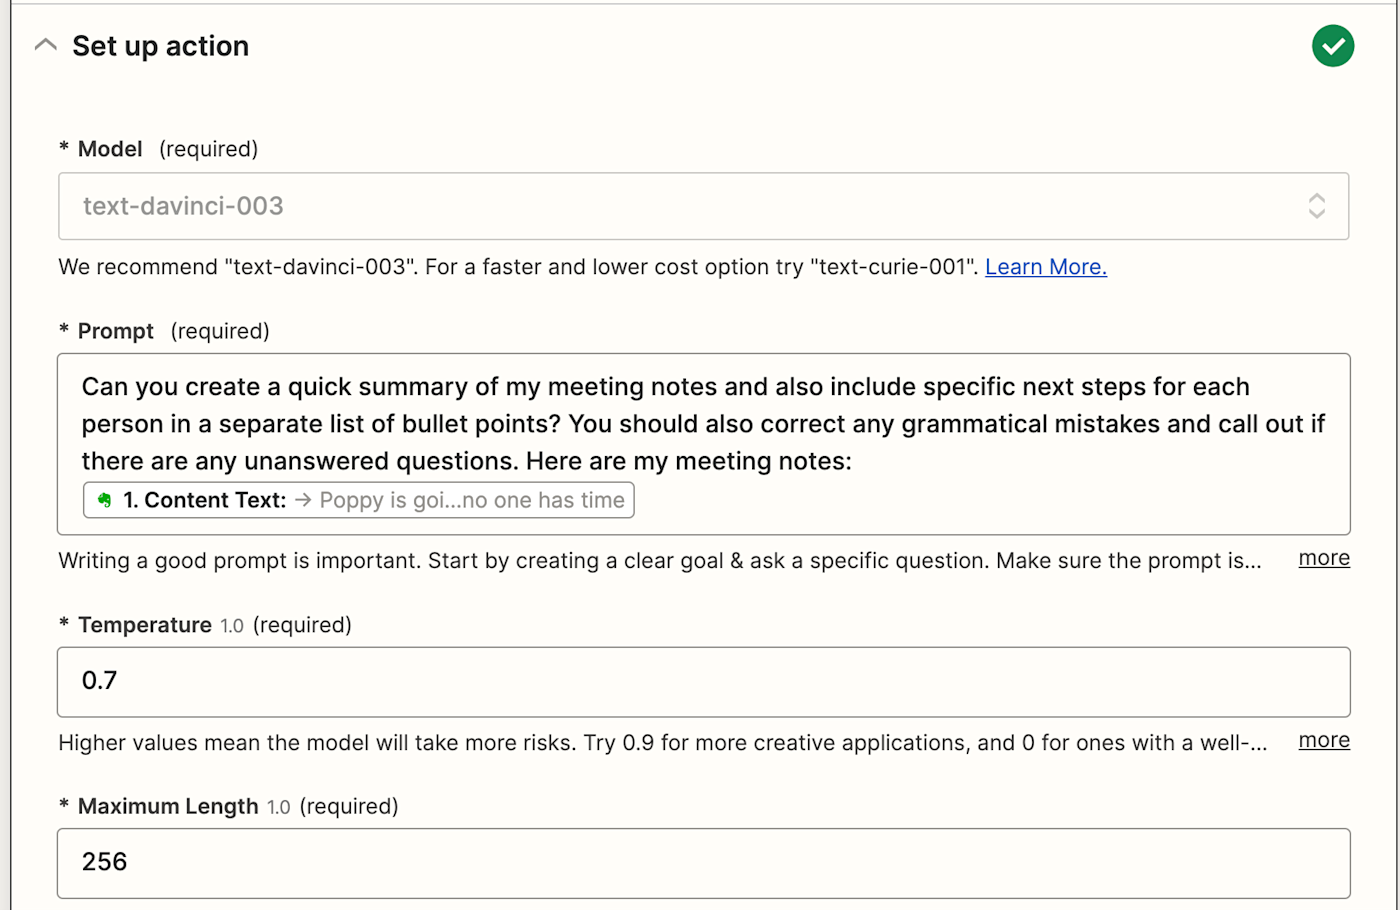
You can also adjust the temperature of the writing you're after (creativity levels) and maximum length. You can also tailor the character or word length directly inside the Prompt field inside your Zap.
Once you've finished customizing these fields, click Continue.
Now it's time to test your action. When you click Test & Review or Test & Continue, Zapier will pull in the summary from OpenAI according to how you customized the fields in your Zap.

Once you see that your trigger is working correctly, click Continue.
Set up your Slack action
Next, it's time to set up one more action step. Select Slack for your action app and Send Channel Message for your action event.
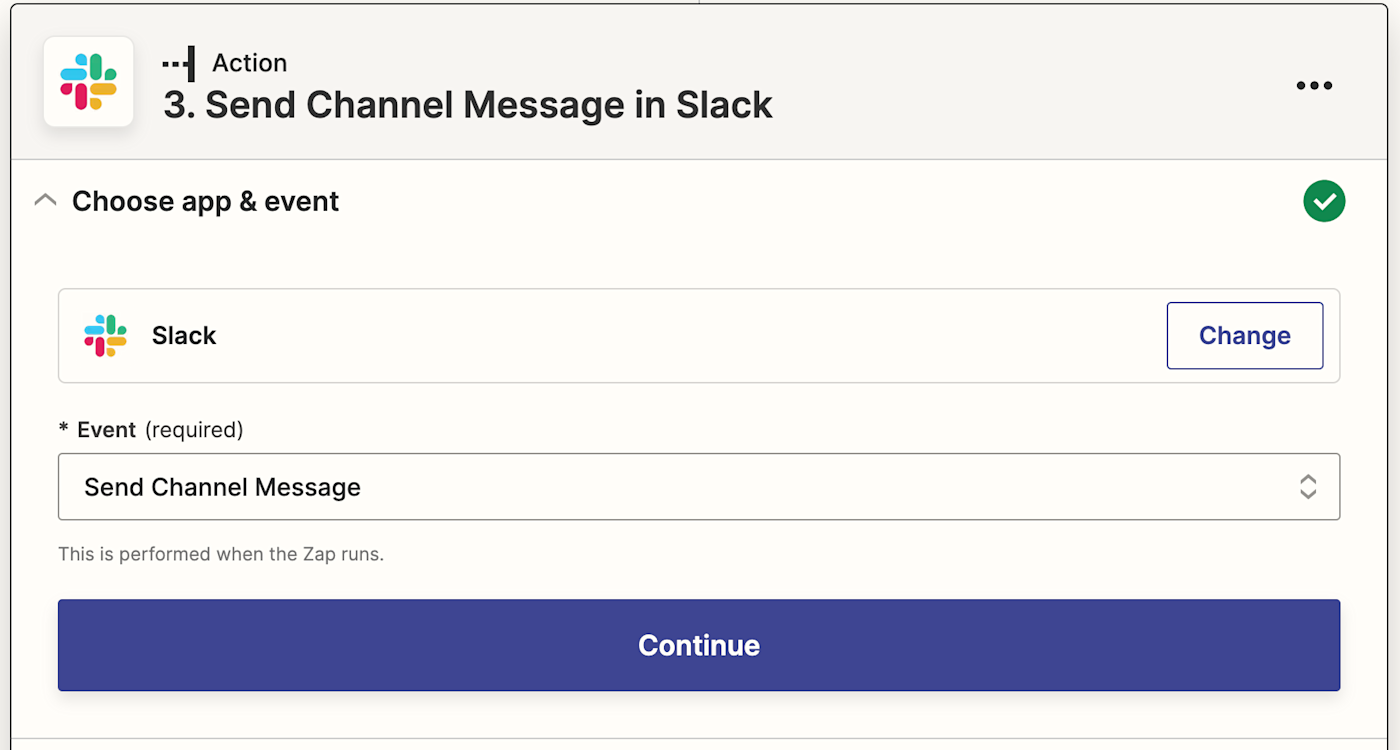
Click Continue. You'll be asked to connect your Slack account. Connect your Slack account and click Continue.
Now it's time to set up the way your Slack message will look. Select which Slack channel you want to send the message to by clicking in the field under Channel.
Once you're done selecting your channel, you can now pull in your GPT-3 results by clicking in the Message Text field and selecting Choices Text from the data dropdown. That will pull in your full message summary into your Slack message.
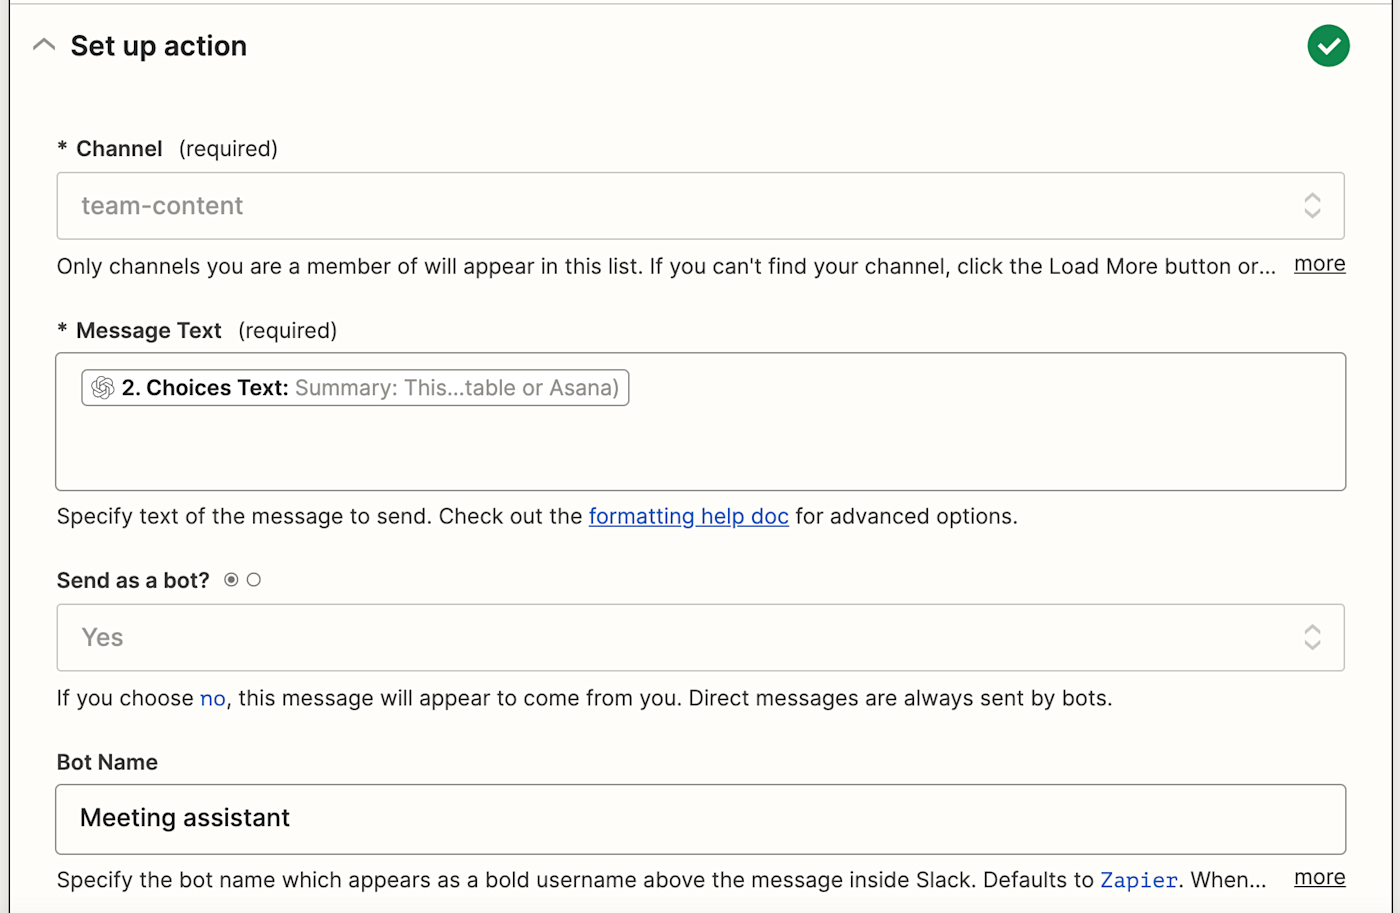
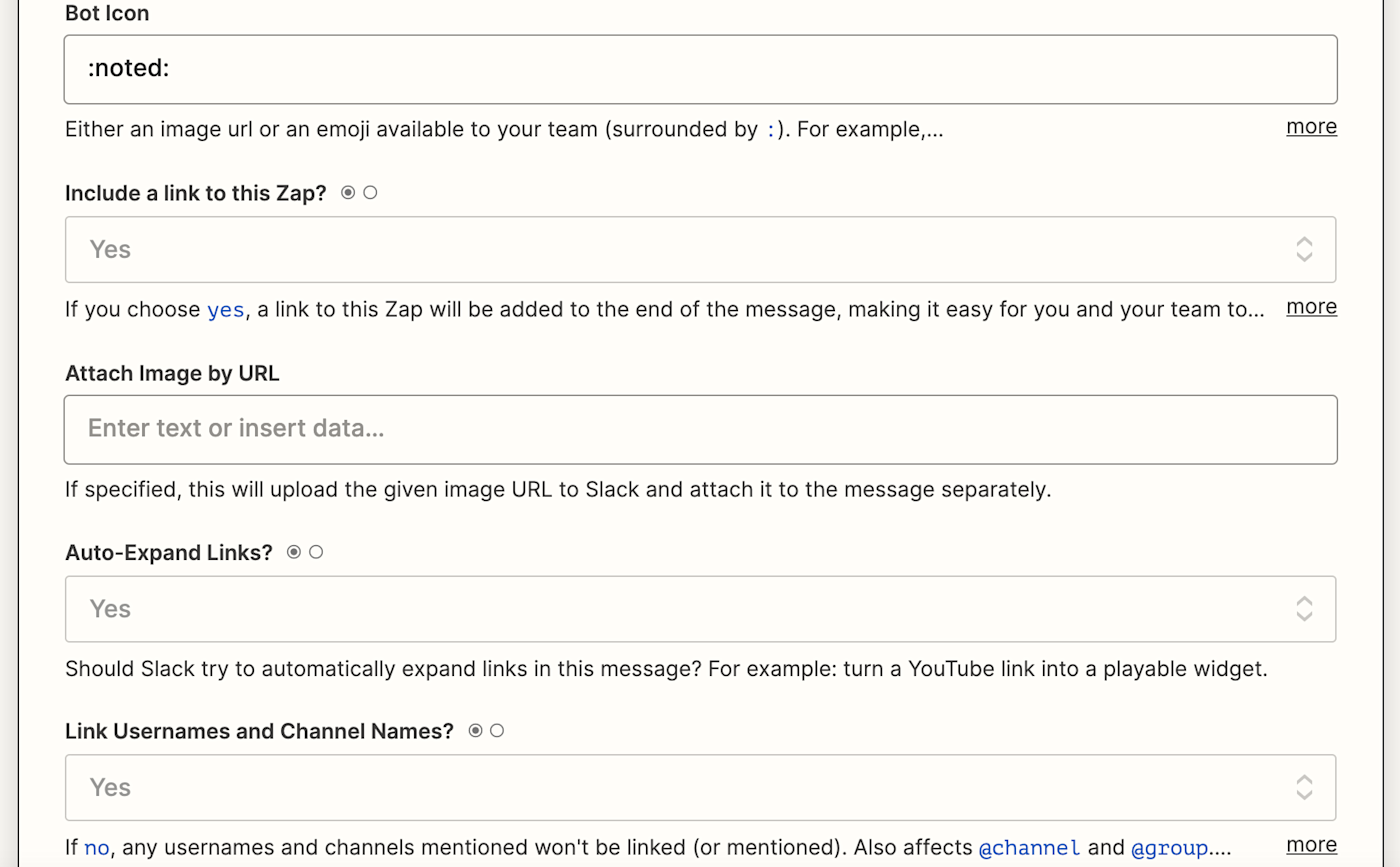
You can also personalize your bot by adding a name to the Bot Name field and adding an emoji to the Bot Icon field. In addition, you can include a link to the Zap, attach images, auto-expand links, or link usernames and channel names.
Once you've finished setting up your step, click Continue. Now it's time to test your action. When you click Test action, Zapier will send a message to Slack according to how you set up your message earlier.
It's a good idea to test your Zap to check if your Slack message looks ok. (Just warn your team first, so they're not surprised.) If it worked correctly, you should see a Slack message formatted the way you set it up.
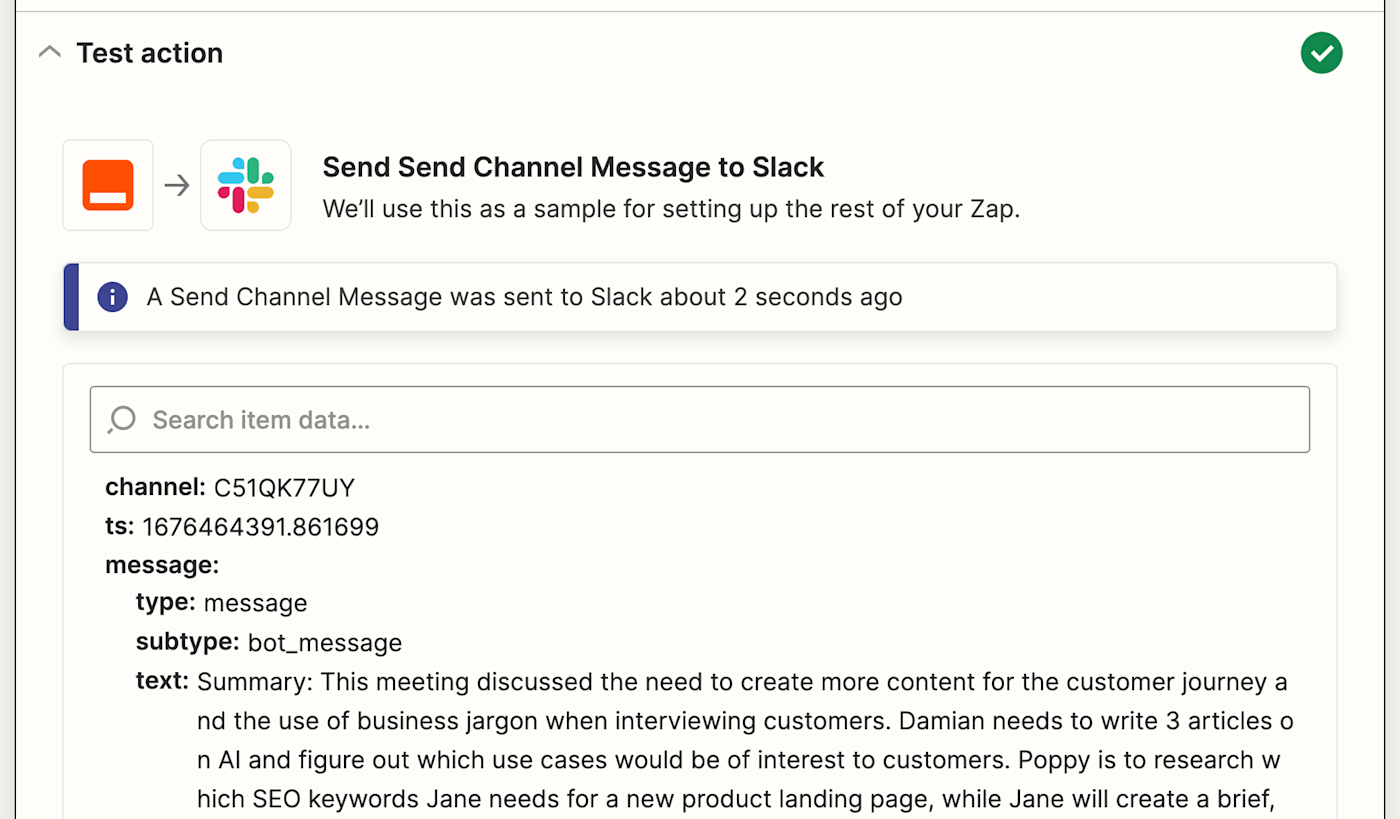
Once you've reviewed the Slack message your Zap created, your Zap is now ready to use. If something looks off, go back and tweak things until you get it just right.
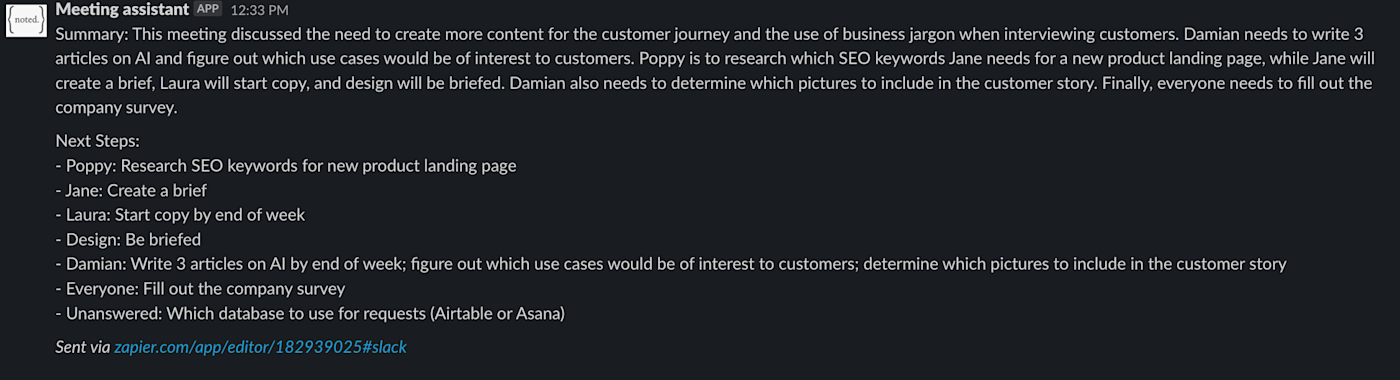
The Zap will now create meeting summaries and send them to your Slack channel in a matter of seconds. Here's what ours looks like:
Write meeting summaries with OpenAI
Now, every time you collect meeting notes in Evernote, this Zap will create a summary of your notes, highlight each team member's next steps, and outline any unanswered questions for you by sending a Slack channel message.
That way, you and your team members can skim through summaries and next-steps without any back and forth.
New to Zapier? It's a tool that helps anyone connect apps and automate workflows—without any complicated code. Sign up for free.