I've taught students virtually for a local college going on four years now. One thing they don't tell you about virtual education, though, is that managing communications primarily via email can become an unexpected part-time job.
After my first semester of teaching, I spent some time wrangling my Outlook inbox using a few of the app's built-in tools—and I haven't looked back since. Here's how to organize emails in Outlook.
Note: There are approximately 16,395 versions of Microsoft Outlook. I'm using Outlook for Microsoft 365, running on a MacBook Pro. Outlook may look slightly different on your end depending on your device or if you're using the web app.
How to organize emails in Outlook
Whether you're going for
inbox zero orinbox infinity—or you just want to stop dreading your inbox altogether—use these built-in tools to help organize your emails in Outlook.- How to create a new folder in Outlook
- How to create rules in Outlook
- How to pin an email in Outlook
- How to flag an email in Outlook
- How to archive emails in Outlook
- How to use Outlook Quick Steps
- How to create categories in Outlook
- How to use Microsoft To Do in Outlook
- How to ignore emails in Outlook
How to create a new folder in Outlook
By default, Outlook comes preloaded with folders including Drafts, Sent items, and Archive. But you can create a new folder to help sort your emails any way you want.
-
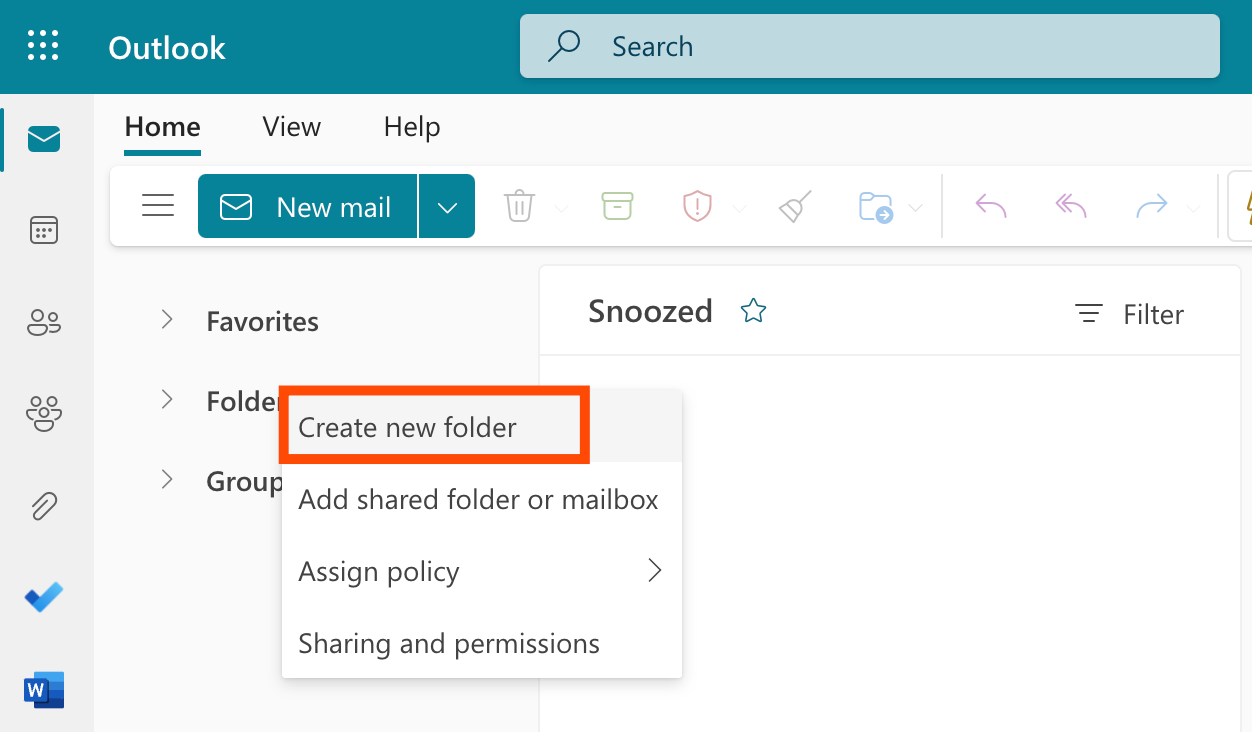
In the navigation pane, right-click Folders, and then select Create new folder. Alternatively, click Folders to expand your list of options, and then select Create new folder.
-
Name your folder, and hit Enter or click Save.


How to create a subfolder in Outlook
If you want to create a subfolder in Outlook, it's just as easy to do.
-
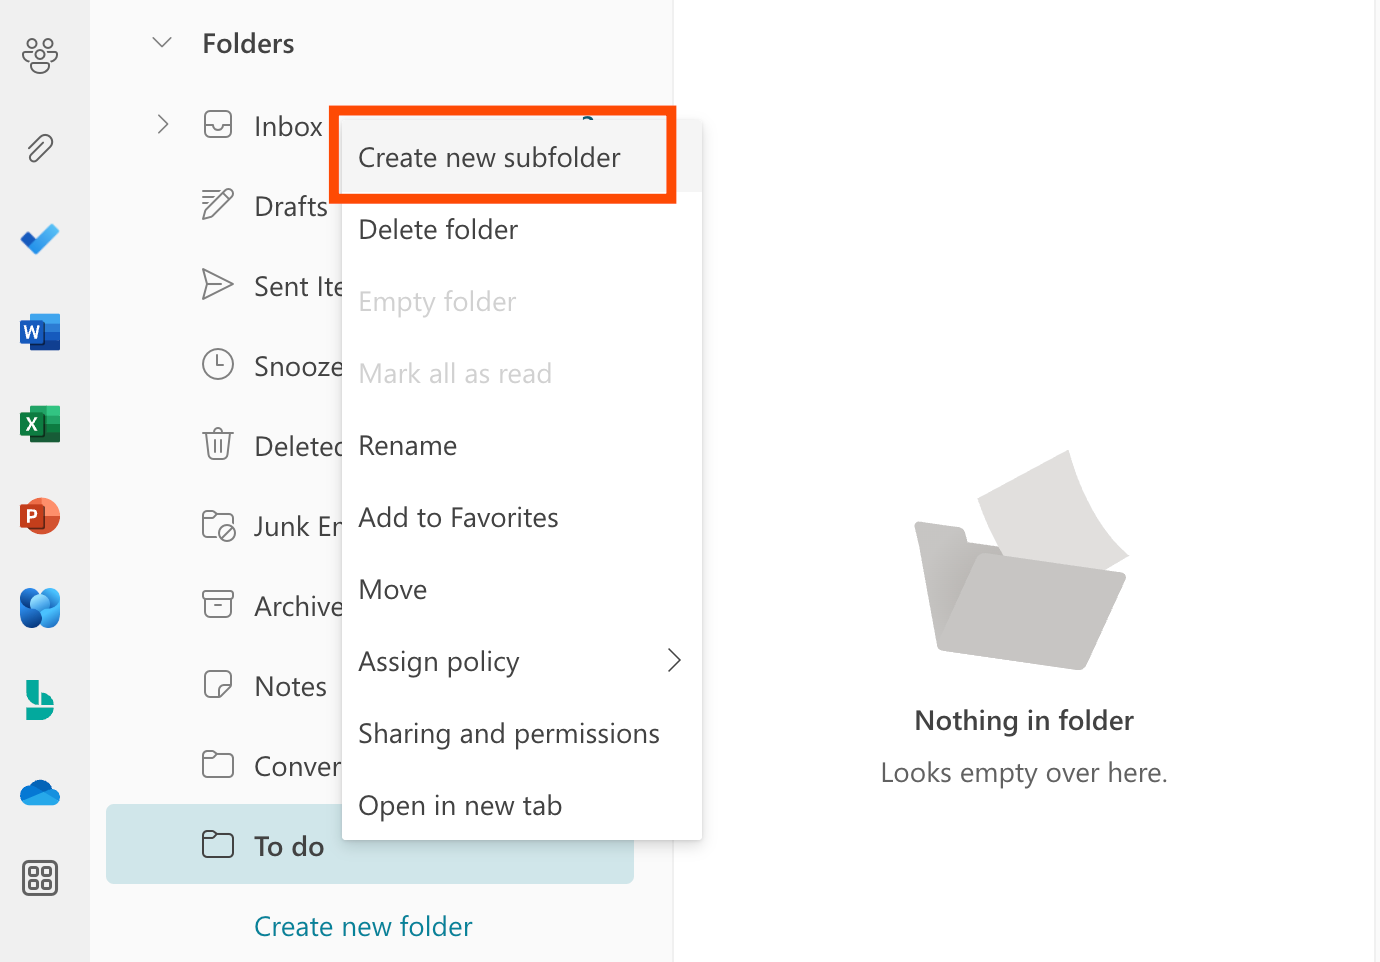
Right-click the parent folder that you want to create a subfolder in, and select Create new subfolder.
-
Name your subfolder, and hit Enter or click Save.

Now, when new emails arrive, drag and drop them in the appropriate folder to keep your inbox organized.
Once you have your folders set up, you can automate them using
Zapier. For example, you can automatically upload messages in certain folders to your OneDrive, save them as to-dos in your task management app, or create new pages in Notion. Here are a few examples to get you started.Zapier is the leader in workflow automation—integrating with thousands of apps from partners like Google, Salesforce, and Microsoft. Use interfaces, data tables, and logic to build secure, automated systems for your business-critical workflows across your organization's technology stack.
Learn more.How to create rules in Outlook
When it comes to email management, the less manual effort, the better. And this is where Outlook rules come in. You can set up rules to automatically sort incoming emails to the appropriate folder. Here's how to create rules in Outlook directly from an email.
-
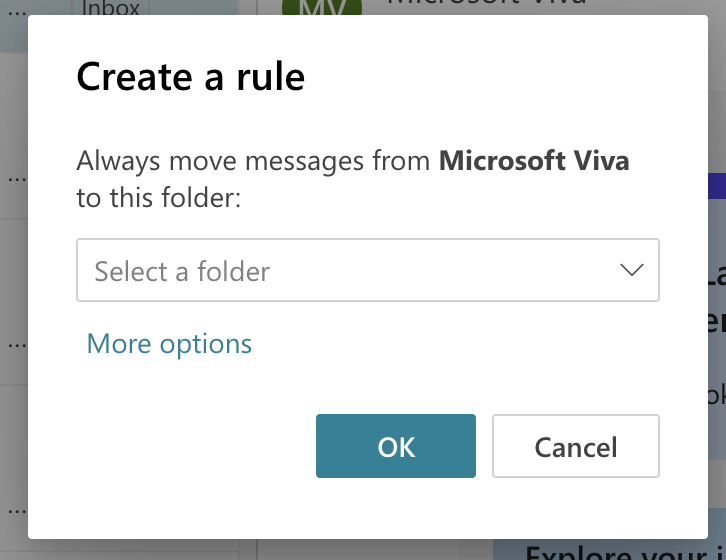
Right-click the email, and then select Advanced actions > Rules > Create rule.
-
By default, Outlook will prompt you to create a rule to move emails from the sender to a designated folder. If that's the rule you want to create, select the folder, and click OK.
-
To customize your rule, click More options.
-
In the Rules window, you have a variety of ways to customize your email rule:
-
Name your rule. Give your rule a clear and concise name, so you can easily understand what it does.
-
Add a condition. Choose the criteria the email has to meet in order for the rule to run. This can include the sender's name or email address. You can even filter by keywords contained in specific areas of the email (e.g., subject line or body).
-
Add an action. Indicate what happens to the email if it meets the specified condition. Outlook provides three main action categories: Organize, Mark message, and Route.
-
Add an exception (optional). Similar to adding a condition, you can indicate specific criteria the email has to meet to be excluded from automatic sorting.
-
Stop processing more rules (optional). If you've created multiple rules, you can also check Stop processing more rules to tell Outlook to
ignore subsequent rules, even if they apply to the email.
-
-
Once you're ready, check the box beside Run rule now.
-
Click Save.


How to pin an email in Outlook
There are certain emails I regularly refer to on a semester-by-semester basis. To keep these emails visible and easily accessible, I pin them to the top of my inbox.
Hover over the email you want to pin, and click the Pin icon (it looks like a thumbtack).

This will pin that email to the top of your inbox—all other emails, including new ones, will appear below your list of pinned messages.

If you don't see your pinned messages at the top of your inbox, make sure your emails are sorted by date (they won't appear otherwise).
-
Click the Sorted by icon at the top of your list of emails (it looks like two arrows: one pointing up; the other pointing down).
-
Click Date.

How to flag an email in Outlook
Another way to quickly keep important emails easily accessible is to flag them. This way, you can then filter to show only flagged emails.
Hover over the email you want to flag, and click the Flag icon.

To view only your flagged emails, click the Filter icon, which looks like three lines stacked horizontally, at the top of your list of emails. Then click Flagged.

If you use flags in Outlook as a way to remind you to follow up with something, use Zapier to automatically turn these emails into action items in your
to-do list app. Here are a few examples to get you started.How to archive emails in Outlook
Outlook permanently deletes any emails in your Deleted Items folder after 30 days. If you want to delete an email that you might need down the road, it's safer to archive emails in Outlook instead.
Right-click the email you want to archive, and click Archive. Or, with your email open, click Archive in the toolbar.

Now, if you need to retrieve that email, you can either manually look through your Archive folder, or use the search bar.
How to use Outlook Quick Steps
Let's say I conduct monthly reviews of vendor invoices. My normal process is to review the invoices, forward them to our accounting team, and then create a reminder to follow up with the accounting team a week later to confirm the invoices were paid.
Instead of manually forwarding the emails and creating follow-up reminders each month, Outlook Quick Steps allows me to automate the process. Here's the simplest way to set it up.
-
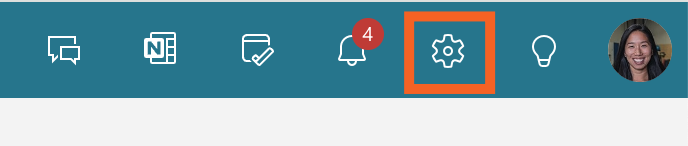
Click the Settings icon, which looks like a cog, next to your profile picture.
-
In the Settings window, click Quick steps.
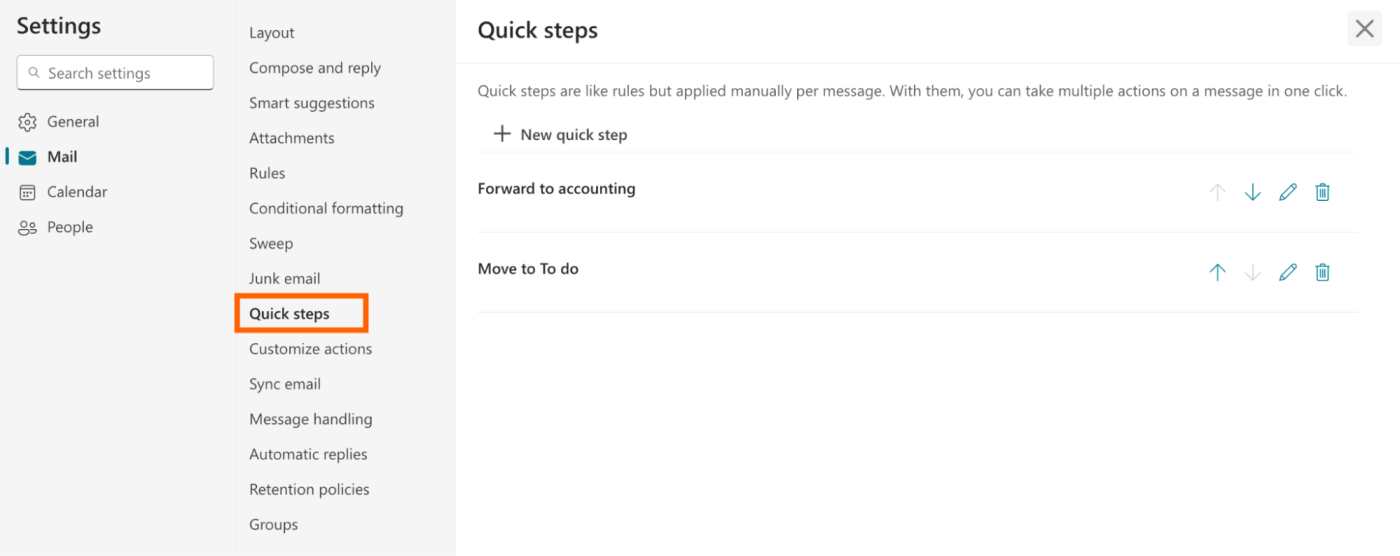
-
From here, you have a variety of ways to customize your step:
-
Name your quick step. Give your step a clear and concise name, so you can easily understand what it does.
-
Choose an action. Indicate what you want to do with the email if the step is applied. You can add multiple action steps.
-
-
Once you've customized your Quick Step, click Save.


The quick step I've created allows me to process the last two steps of my monthly invoice review process (forward email and create a reminder task) with just one click.
To apply the step to an email, click the down caret (
⋁) next to the name of the Quick Step you just created (it'll have replaced the default text Quick steps) in the Home tab of your ribbon, and select the step you want to take.

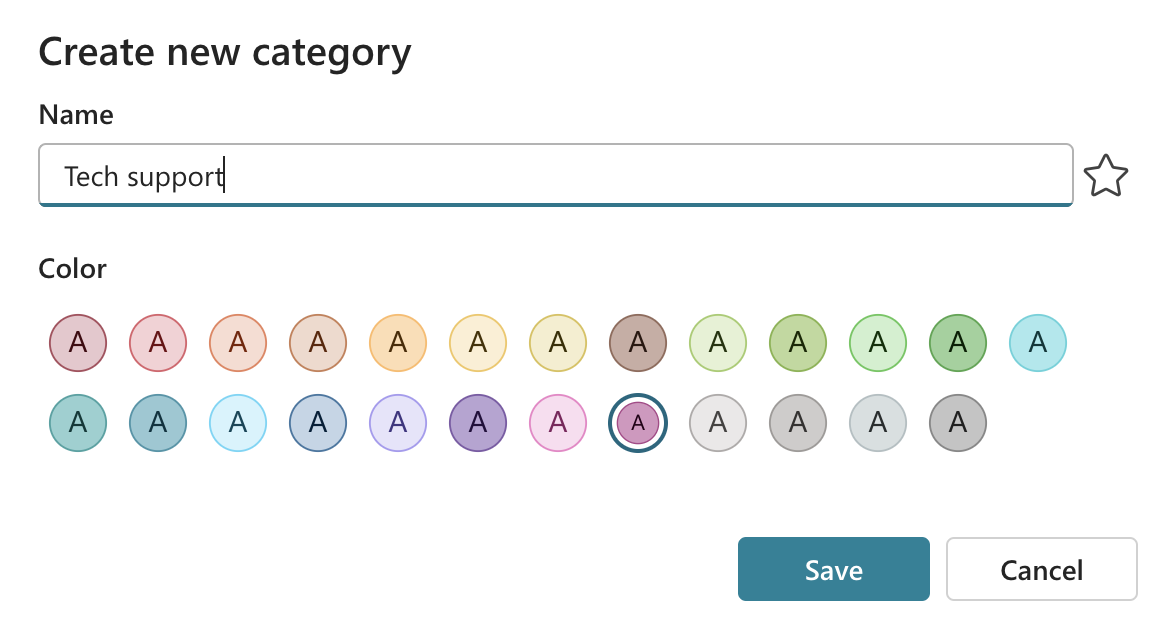
How to create categories in Outlook
Labels (or tags) are a great way to categorize emails for hassle-free searches. I also use them to give me a quick glimpse into who the email's from, so I can quickly determine its priority level. But as with any great organization system, there's a science to it.The key is to keep it simple. Don't overdo it with the number of labels you create. For me, I stick with three labels: College admin (contracts and other paperwork), Faculty comms, and Student comms.
-
Right-click the email you want to create a new category for.
-
Click Categorize, and then select New category.
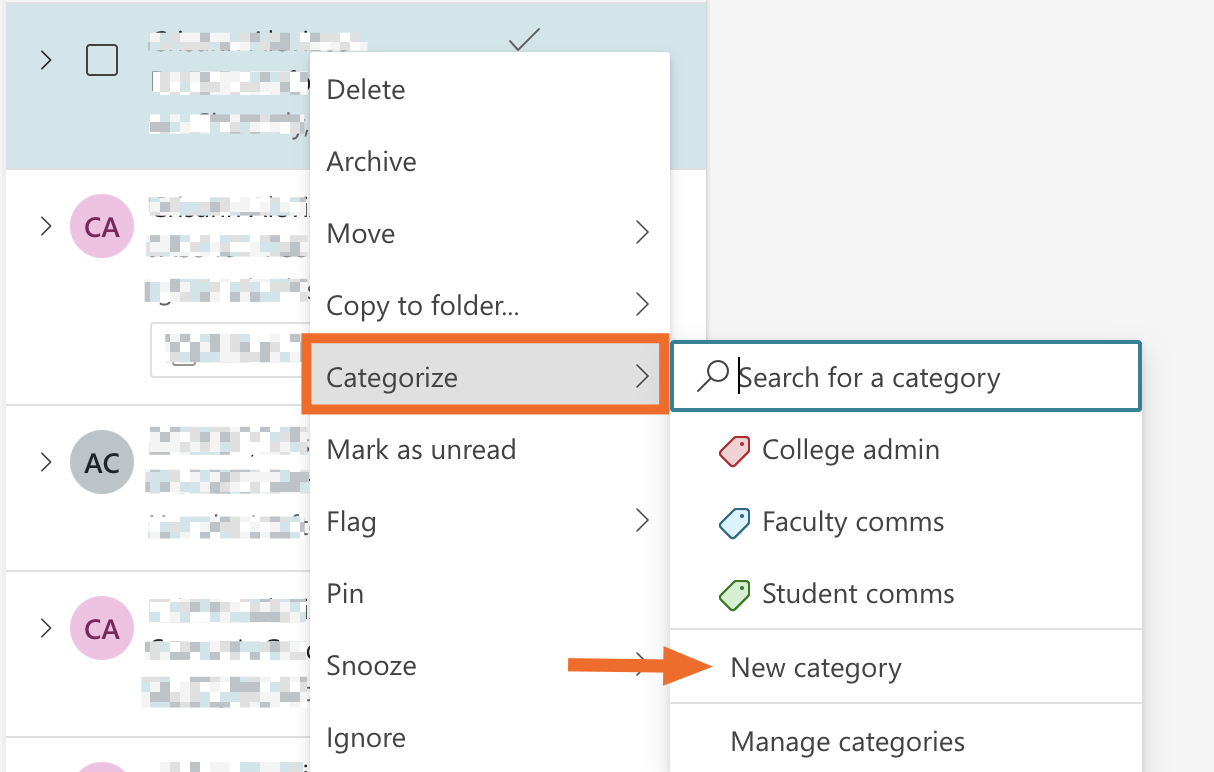
-
Give your category a name, pick a label color, and then click Save.


Since you know
how to create rules in Outlook, you can also automate the labeling process.To label an email with an existing category, right-click the email, click Categorize, and select the label you want to apply.
How to use Microsoft To Do in Outlook
If you live in Microsoft's ecosystem, there's a good chance you keep track of your tasks using
Microsoft To Do. In this case, Microsoft makes it easy to turn emails into tasks in To Do.Note: The instructions below are for how to add emails to your task list in To Do using Outlook in Microsoft 365. If you're using
Tasks in Outlook.com, the instructions are slightly different.-
From the Outlook toolbar, click the My Day icon, which looks like a calendar with a check mark. The My Day To Do pane will automatically appear.

-
Drag the email you need to address to the To Do pane, and drop it in the Add as a task section. If you want to create a calendar event from an email, you can also drag and drop it in the Add as an event section.
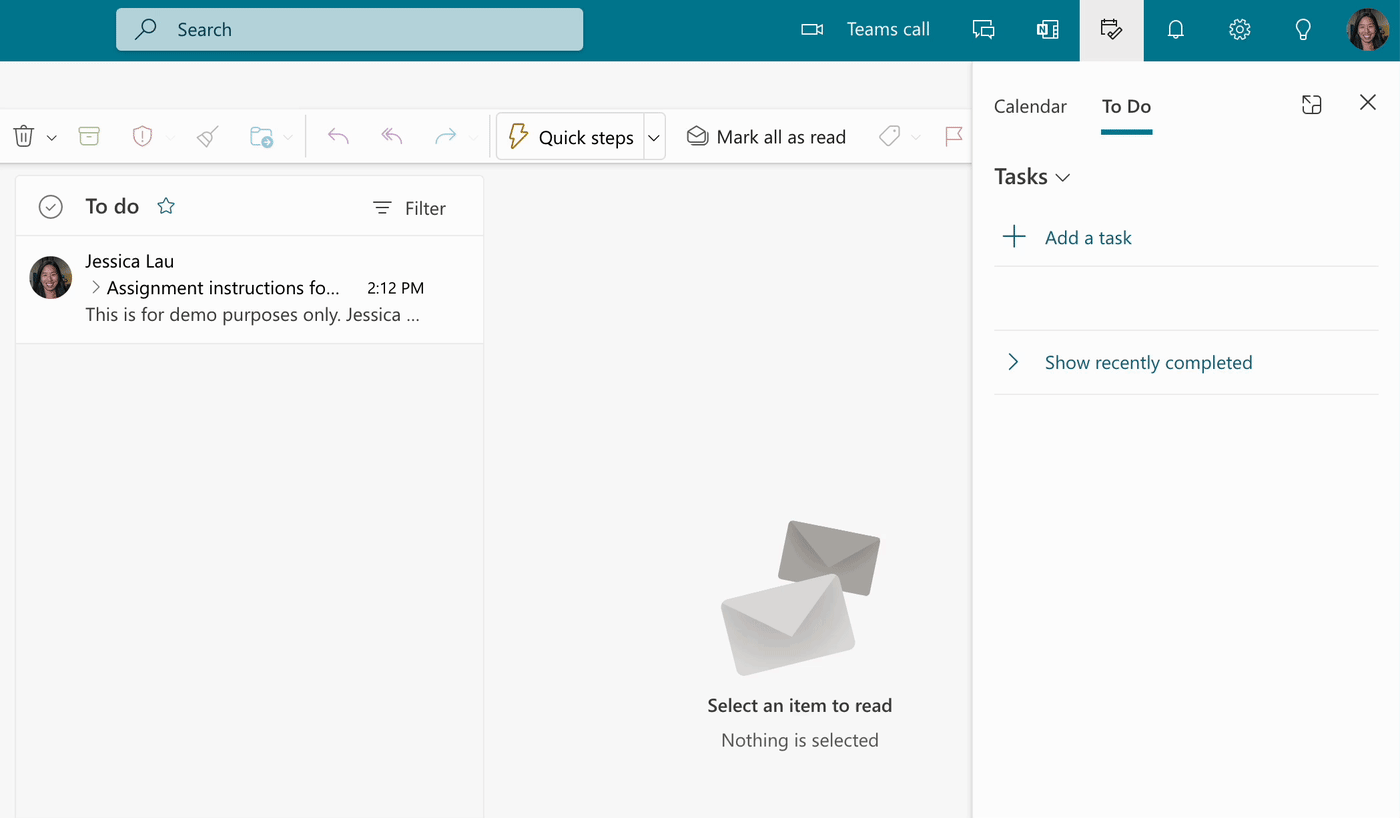
By default, the subject line of your email will appear as the task name, but you can edit this by clicking the name. To review the email the task originated from, click the View email icon, which looks like an envelope.

-
To customize your task further, right-click it, and choose from a list of options, including Set reminder and Set due date. When you set a due date or reminder, those dates will appear directly below your task.
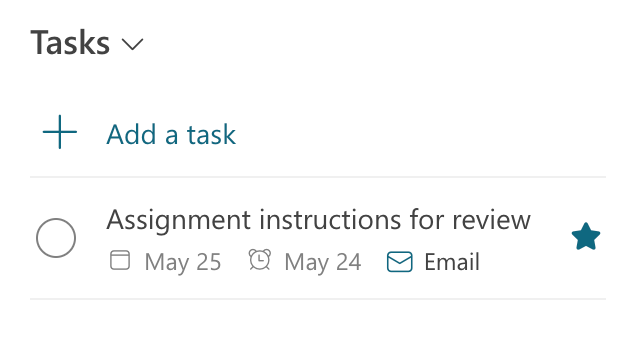
Need to flag a task as important? Click the Mark as important icon, which looks like a hollow star beside your task. (A filled-in star indicates the task is important.)


If you set a reminder, a Reminders window will pop up in Outlook at the specified time. Not ready to check off the task yet? Hover over the task, and click the Snooze reminder icon, which looks like an alarm clock.

Once the task is complete, check it off by clicking its Mark as completed icon, which looks like a circle.
How to automatically add flagged emails in Outlook to Microsoft To Do
You can also adjust your Microsoft To Do settings so that when you flag an email in Outlook, it automatically appears as a task in To Do.
-
Go to
to-do.office.com. -
From the toolbar, click the Settings icon, which looks like a cog, and then click To Do Settings.

-
In the Settings window, under Connected Apps, click the toggle next to Flagged email.


Here's how to view only your flagged emails in Microsoft To Do.
-
From Microsoft Outlook, click the My Day icon from the toolbar.
-
Click the down caret (
⋁) next to Tasks, and then select Flagged emails.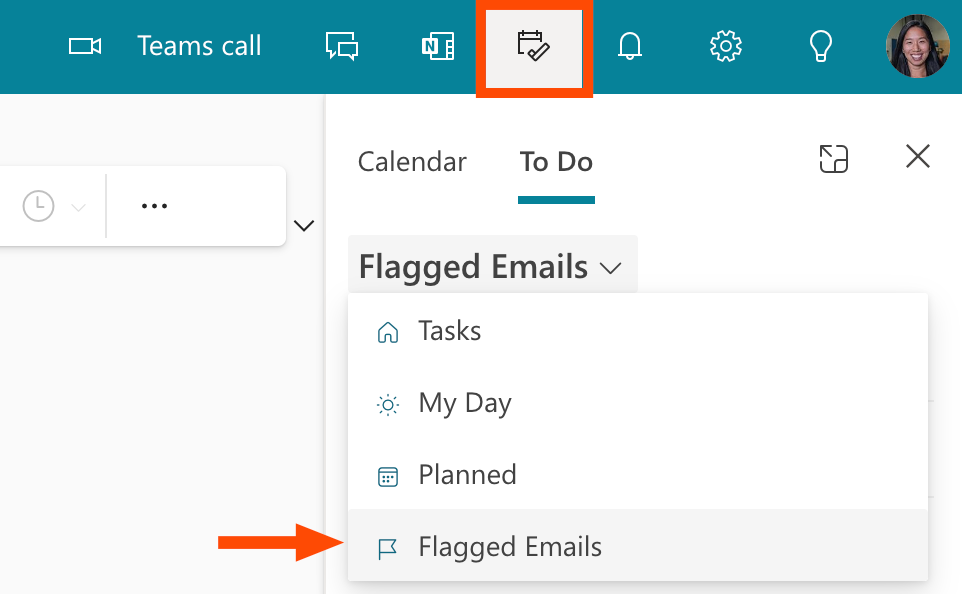

How to ignore emails in Outlook
In my experience, there are only a handful of occasions
when it's appropriate to reply all. But instead of asking folks not to click Reply all (it rarely works), I've found a simple solution to keep these long-running threads out of my inbox: ignore them.-
Right-click the email thread you don't need to be a part of.
-
Click Ignore.
-
In the Ignore conversation? pop-up, click OK to confirm your action.
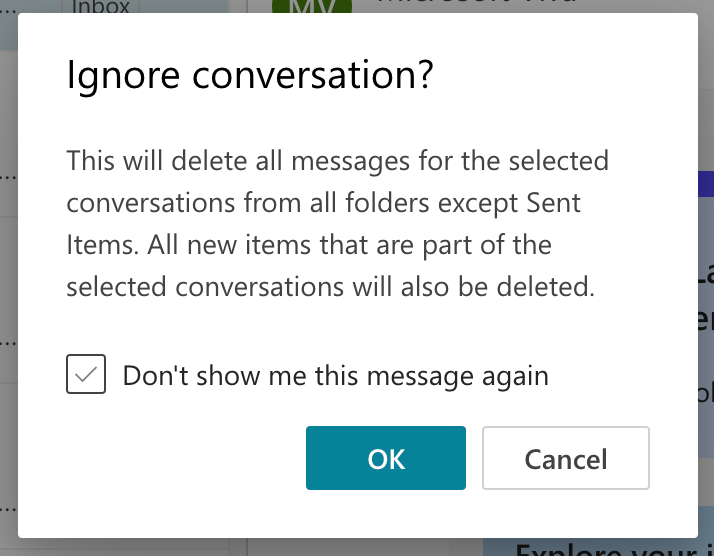

All future replies to that email thread will automatically be sent to your Deleted Items folder instead of your inbox.
Automate Microsoft Outlook
Microsoft Outlook lets you automate a few processes within the app. But when you
connect Outlook with Zapier, you can automate even more of your daily workflows across thousands of other apps. For example, if you manage multiple calendars, you can automatically cross-post events across calendars so you never miss a meeting.Or, if you don't have the bandwidth to respond to a daily influx of emails, you can
use ChatGPT to draft and send responses for you.Learn more about
how to automate Microsoft Outlook, or get started with one of the pre-made templates above.Related reading:
- Automation ideas for Microsoft Office 365
- How to use Scheduling Assistant in Outlook
- How to add new Outlook emails to Notion
- Outlook email signature templates—and how to create your own
This article was originally published in October 2017 by Jessica Greene. The most recent update was in October 2024.