We all know the deal: leads are the bread and butter of any business. But it's not just up to your sales team to strike while the iron is hot.
Converting prospects into paying customers starts a lot earlier, usually with your leads themselves. After all, they're the ones who have to express an interest in you first.
That's why having a free offer download in place is a great way to prove to your leads the value you offer early on in a way that gives them a detailed overview of who you are and what you do. Whether you want to offer an eBook, a guide, or some kind of trial run for free, you should think about incorporating this into a form so you can also collect their information for later use.
With
Zapier Interfaces, you can build custom forms that help you capture leads—and that automatically connect toZapier Tables, a database powered by automation.In this blog post, I'll walk you through exactly how to create your own free offer process, so your sales team can follow up with and convert your leads.
New to Zapier? It's workflow automation software that lets you focus on what matters. Combine user interfaces, data tables, and logic with thousands of apps to build and automate anything you can imagine.
Sign up for free.Table of contents:
- Step 1: Build your free offer form in Interfaces
- Step 2: Customize your free offer form
- Step 3: Test out your free offer form
Before you begin
Make sure you have a Zapier account. You'll also need to access
Zapier Interfaces, which is where you can build your free offer form, andZapier Tables, which is where you'll store the data from your form.
Step 1: Build your free offer form in Interfaces
Let's start off with creating a free offer form from one of our pre-made templates. Click Try it on the template below, then click Use template in the new window.
This will create your page within Interfaces. Your page will include a Free offer layout, which is the front-end of your free offer form.

As you scroll down, you'll see that your free offer page is automatically connected to a table where all responses are saved.
Zapier Tables are no-code databases—powered by automation—that are easy to use and scale. They're the perfect place to store lead information from your free offer downloads, so you can easily track and take action on any prospects interested in your product.
Under the Zaps section, you'll see any automated workflows that are connected to your free offer form or related table. These workflows are called Zaps, and they're a great way to automate processes and follow up with prospects once they've submitted their information.
When you create a free capture form from the template, Zapier automatically creates a Zap for you. This Zap will send your lead an email whenever they submit your free offer form, with a link to the download you're offering.

Now this part is super important. For your lead to receive your offer, you'll have to provide the Zap with the link to your download, otherwise it will show up empty in the lead's email folder. To customize your Zap, click on it.
You'll be taken to the Zap editor. Click on Edit draft.

First, test your trigger to make sure it works. Once that's working, go into your action step.

You can customize the email message your lead will receive, but all of the fields are already set up for you. So the most important thing will be providing your download link. Under the Body field, replace the placeholder text with your link.

You can either place HTML in this placeholder bracket, or you can just provide the URL itself. We've used HTML, so it's formatted in a nice way:

Under From Name, remember to replace the placeholder text with the name of your own company or brand.

And that's it! Once you've tested the trigger to make sure the Zap is working, remember to publish your Zap.
Step 2: Customize your free offer form
Now that you're familiar with your interface layout and you've set up your Zap, click on your Free Offer page.

You'll be brought to the backend of your form, where you can edit the fields so that your form says what you want it to say—and gathers the information you want to collect.
This particular template includes a pre-made form with existing fields (like name, email, phone number, company information, and a notes section).

Of course, you'll want to personalize the form according to your brand. In my instance, I'm going to create a basic free offer download form for an eBook on automation. This guide will be for any potential customers interested in learning how to automate for free in exchange for their information.
Give your form a title and header copy
Let's start by personalizing your form's title and header copy. Click Edit, next to the existing title on your form page.

A right-hand side panel will appear—this is where you can edit the top text of the form (how you address your lead). Add a personalized header and a descriptive paragraph using
markdown. Here's what I wrote:
This panel also lets you adjust the width and text alignment of your form elements. I'll leave mine on the default setting (center), but you can experiment to see what works best for your form.
Edit and add questions to your form
Once you're happy with your form header, it's time to edit your form's entry fields. Click back into your form (your header text will save automatically) and click Edit next to the form's questions.

Within the right-hand side panel, you can edit your general form fields, including the text for your individual questions, your form's overall width and alignment, and your CTA button text.

To edit the text within your questions, click on the pencil icon under Fields.
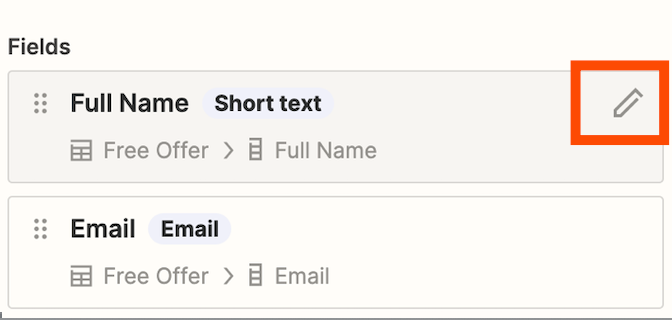
This will bring you to a card where you can change each field's details. You'll be able to add different parameters to each question, including the text, type of text for your replies (like short text, email, long text, etc.), a label, placeholder text, and help text. You can also choose to require certain answers if they're important (like an email address) or to hide them from view.

Once you're happy with each of your field's questions, go back into your main form fields. If you want to add a new question that's not within the template, just click Add Field and follow the same process as above.

For example, you might want to add an extra question to understand more about your lead, like their specific job role.
Tip: You can also rearrange the order of your questions by clicking on the click-and-drag icon on the left-hand side and dragging and dropping it into a new position.

Repeat this same process for each of your form's questions until you're happy with the result.
Note: You can also
add conditional logic into your form, insert fields into your formfrom existing tables, andfill forms fields in advance for your users.Here's what my finished form looks like:

Now click on Edit again next to your form's questions. If you go to the Data tab, you'll see the name of the table that this form is connected to (where your free offer requests are stored).

You can also click on the Actions tab if you want to see which Zaps are set up with this form and which events will kickstart those Zaps. You'll see the Zap that Zapier pre-set up for you, which is the one that sends your lead an automatic email with the free download.

You can also
build new workflows directly from within this section. To add another Zap to your interface, click Add action, then Create Zap. This will take you to the Zap editor, where you'll see the trigger event (a form submission created in Interfaces). You can then click the + icon to add an action step.For example, you might want to pass on that lead information to your sales teams in Slack whenever anyone submits their details. Like so:

Once you've published your Zap, you can navigate back to your Interfaces page under your Actions tab. This is where you'll see your new published Zap.
Note: You can learn more about adding actions to your form
here.
Adjust your form's settings
Once you're happy with the way your lead capture form looks, click on the Page Options button in the top-left corner of your interface page.

Here you can adjust your page options and personalize your page name, the meta title (what's displayed in browser tabs), and the URL for your free offer form.

For more advanced settings, click the Gear icon in the left-hand sidebar of your interface.

Here you can give your interface a name and change your form's subdomain. This side panel is also where you can adjust your interface's theme (color and branding), insert a custom domain, set user access, and more.
Note: To adjust advanced settings, you'll need to
upgrade to a premium or advanced account with Interfaces.Step 3: Test out your free offer form
Now that you've customized everything in your form, from the field text to your advanced settings, it's time to test it out to make sure everything's working as it should. Click on the URL provided in the top-left corner of your interface.

This will take you to the front-end of your free offer form—what your customers will see. This is my finished form:

Drop in some test answers to your questions and hit submit.
Tip: Add in your own email address so you can see exactly what your future prospects will receive via email.

Now, thanks to the Zap that was set up, you should receive an email to let you know that your free offer is available for download. Here's what ours looks like:

That's what your prospects will see whenever they fill out your form.
You might now be wondering where your company will store that lead information, so you can take action on it. Go back to your free offer page in Interfaces and click on your table.

You'll be shown the associated table with your form's test response. Ours looks like this:

Tip: You can share this table with your team members and anyone else at your company by clicking on Share in the top-right corner. You might, for example, want to share this table with your entire sales team so they can reach out to leads while they're still warm. To learn more about Zapier Tables,
check out our feature guide.
Streamline your prospect follow-ups with Zapier
With Zapier's automation platform, you can build effective free offer forms that promote your services and do a great job of generating leads. Whether you're offering free eBooks, digital files, or guides, you'll be able to automatically reach out to your prospects with your offer, and then share that lead information with your sales team for timely follow-ups.
You and your team will have a more reliable way of gathering and tracking your lead information—all in one seamless workflow.
Related reading:
This article was originally published in June 2023. It was most recently updated in August 2024.