Stable Diffusion is
the most flexible AI image generator. It's entirely open source, and you can even train your own models based on your own dataset to get it to generate exactly the kind of images you want.This means that there are really lots of ways to use Stable Diffusion: you can download it and run it on your own computer, set up your own model using Leap AI, or use something like NightCafe to access the API. But the simplest option—and the one I'll walk you through here—is through Stability AI's official DreamStudio web app. It's easy to use and a great way to get play around with Stable Diffusion. So let's dive in.
How to sign up for Stable Diffusion
DreamStudio is the official Stable Diffusion web app. Here's how to sign up for DreamStudio:
-
Close any pop-ups about new features, and agree to the terms of service if it asks.
-
Click Login in the top-right, and create a new account.

Once you sign up, you get 25 free credits—which is enough to try seven different prompts and generate around 30 images with the default settings. Extra credits are pretty cheap, too: $10 gets you 1,000 of them. Once you run out, you can also explore running Stable Diffusion for free on your own computer.
How to generate an image with Stable Diffusion
Let's start by generating your first image. Over in the left sidebar, DreamStudio has all the controls. You get a lot more options than you do with DALL·E 2, for example, but let's start simple.
The Style dropdown allows you to choose a specific style of image for Stable Diffusion to generate. The options here are pretty broad. The default, Enhance, produces realistic—but not photorealistic—images and is always a good option. Otherwise, feel free to try whatever catches your eye: you can choose from Anime, Photographic, Digital Art, Comic Book, Fantasy Art, Analog Film, Neon Punk, Isometric, Low Poly, Origami, Line Art, Craft Clay, Cinematic, 3D Model, or Pixel Art. Have fun.
The most important bit is the Prompt box. This is where you enter a description of what you want Stable Diffusion to create. There's always a random suggestion there to give you some inspiration (and you can cycle through for more), but you should enter whatever you want. Some of my favorites ones to try are:
-
A painting in the style of Vermeer of a large fluffy Irish wolfhound enjoying a pint of beer in a traditional pub
-
A Canadian man riding a moose through a maple forest, impressionist painting
-
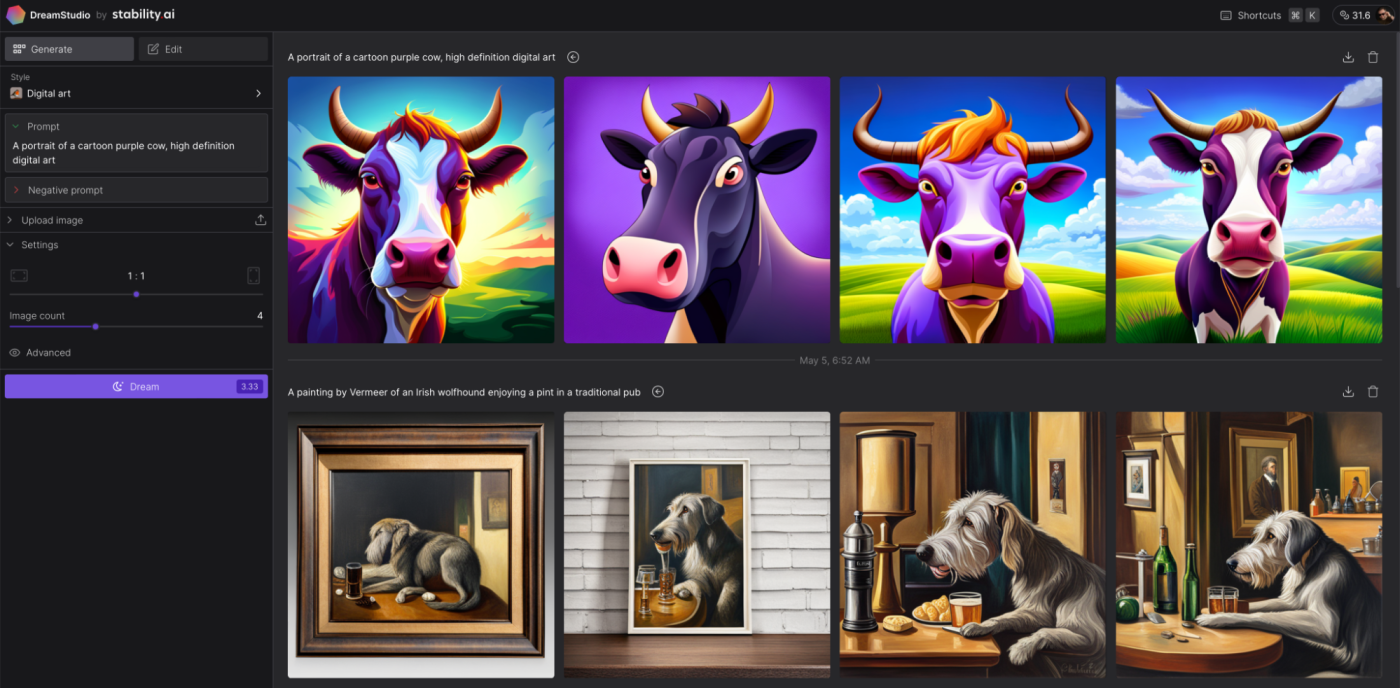
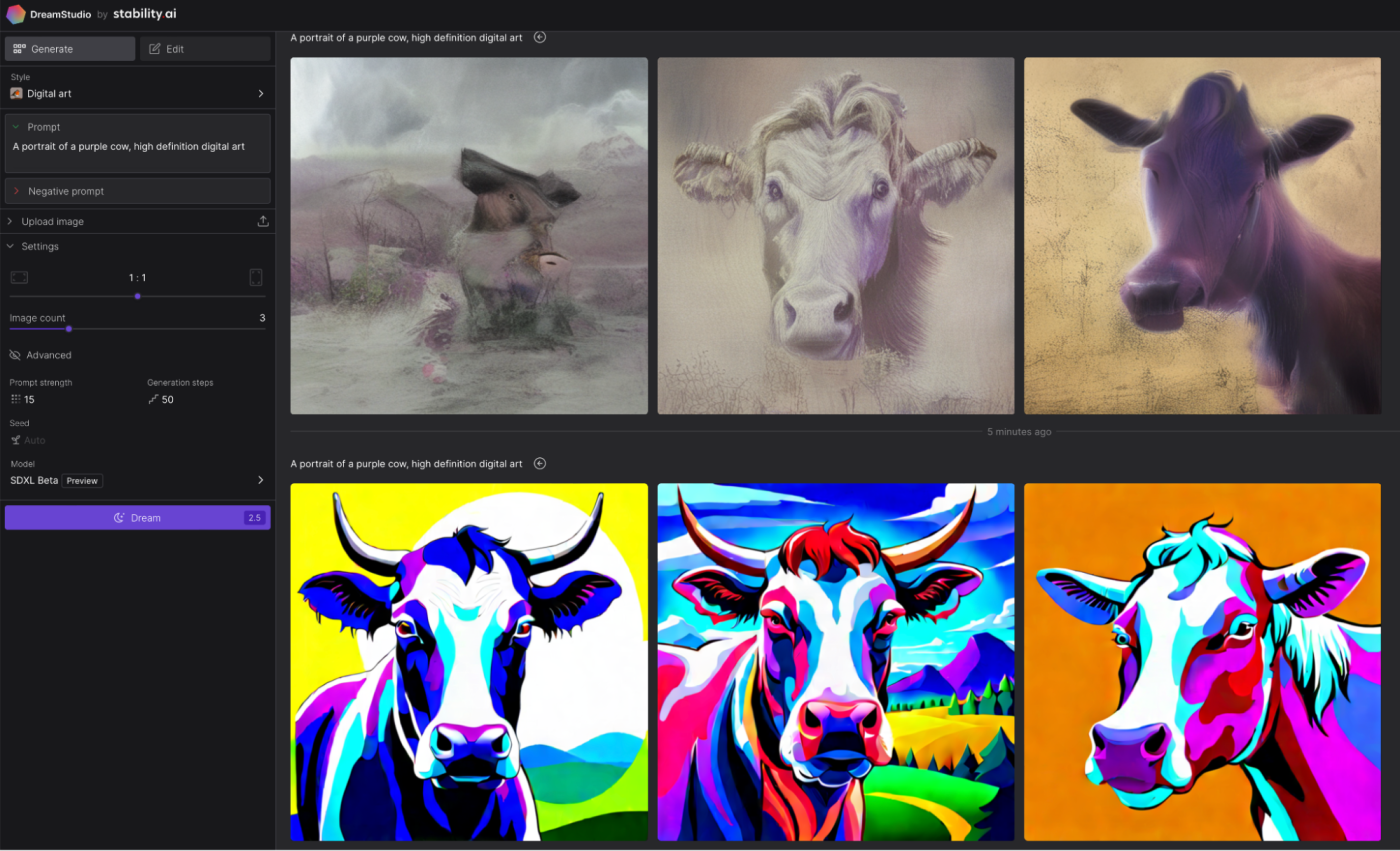
A portrait of a cartoon purple cow, high definition digital art.
With your prompt entered, you can ignore the other options for now, and click Dream.
(The numbers on the button let you know how many credits it will cost to generate the artwork with the settings you've selected. By default, it will be 3.33.)
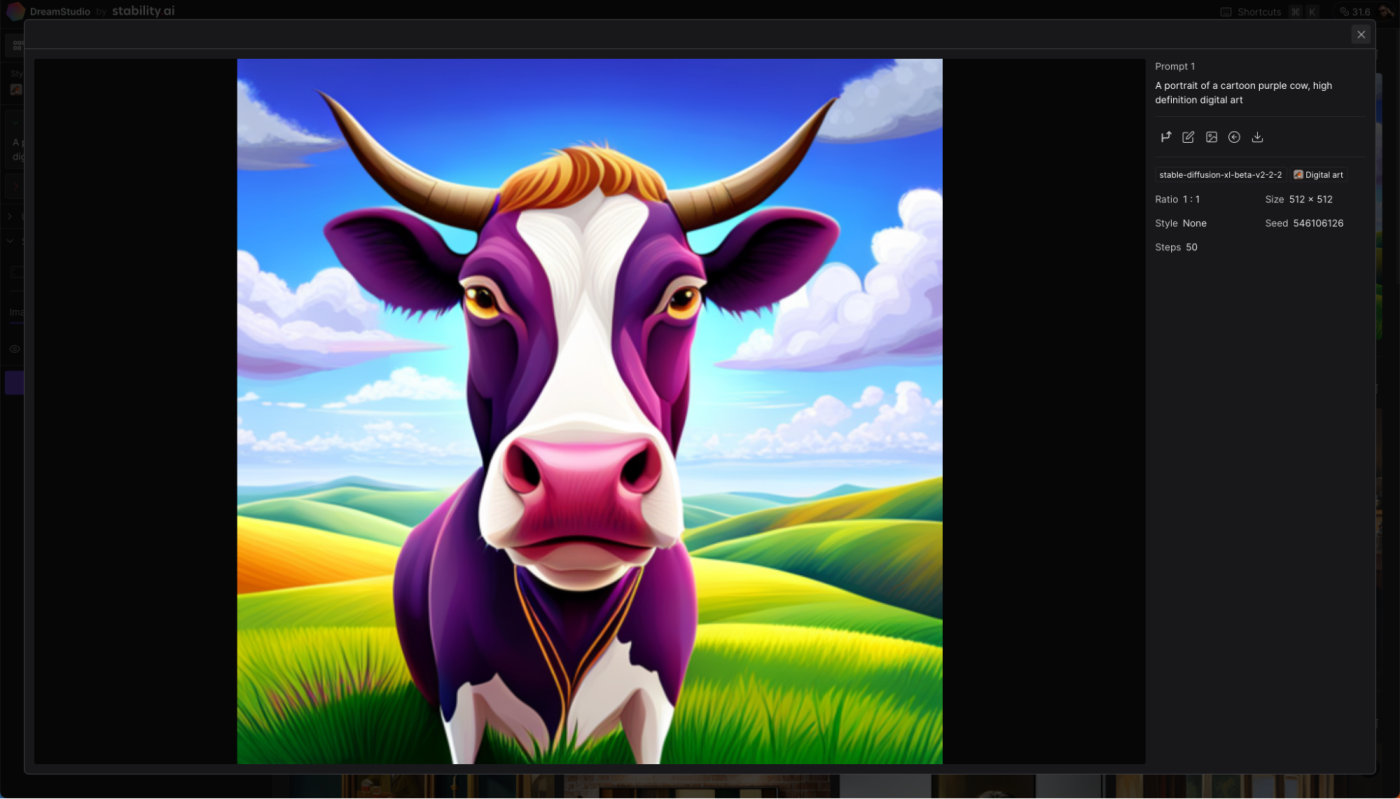
Wait a few moments for DreamStudio to do its thing, and you'll have four options to choose from. Select your favorite image, and then you can use the buttons at the top of the right sidebar to download it (and optionally upscale the resolution), reuse the prompt, generate additional variations, edit it, or set it as the initial image—which makes it part of the prompt.
Refine your image in Stable Diffusion
While the Style options give you some control over the images Stable Diffusion generates, most of the power is still in the prompts. With DreamStudio, you have a few options.
Focus on the prompt
The Prompt box is always going to be the most important. To make the most of it, describe the image you want to create in as much detail as possible, though it's worth bearing a few things in mind:
-
The more specific you are, the better. If you want bananas, don't say fruit—say bananas.
-
But don't make your prompts too complicated. The more details you include, the more likely things are to get confused. Similarly, the current generation of art generators can struggle to understand specific quantities, sizes, and colors.
-
Consider the details. You can add descriptors for the subject, medium, environment, lighting, color, mood, and composition, among other things.
-
Play around. The best way to learn is just by trying different things.
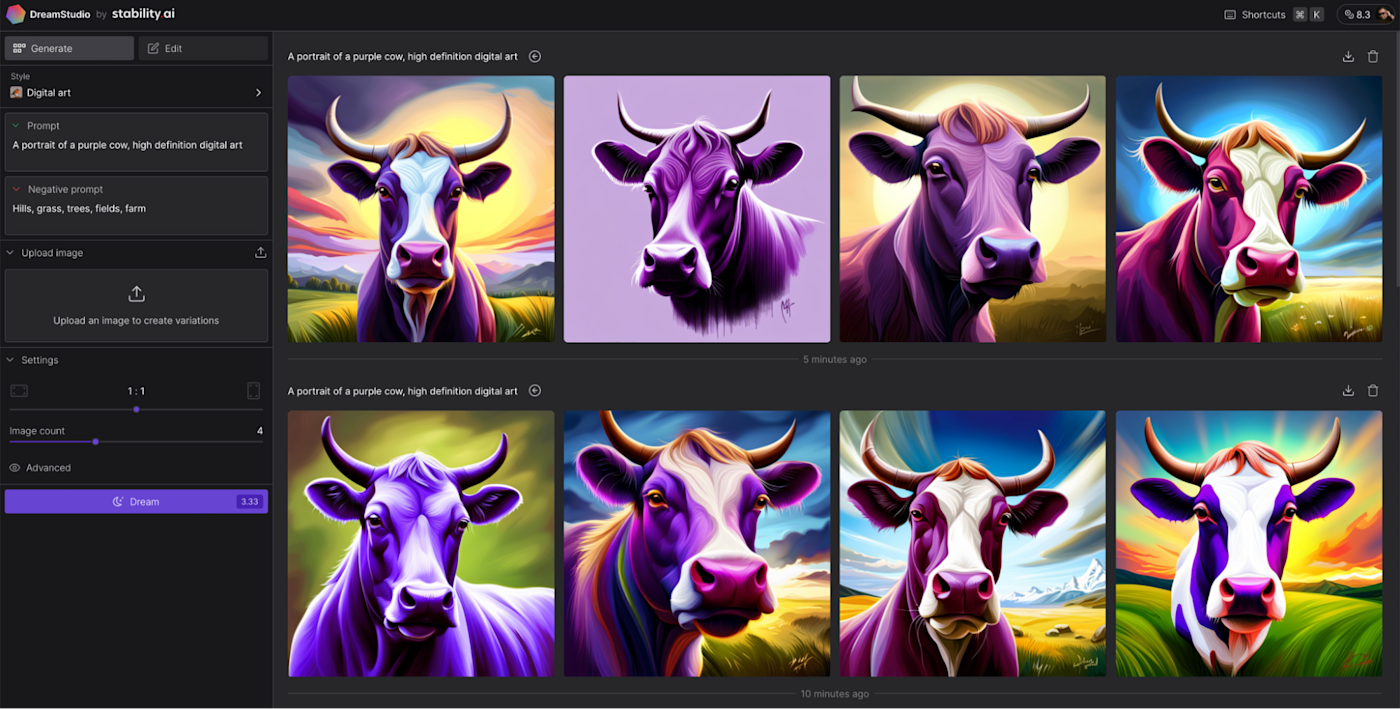
Use negative prompts
The Negative prompt box allows you to list the things you don't want included in your image. It's not quite as effective as I'd like, but it can help skew your generated images in certain directions.
For example, in the image above, I've used "hills, grass, trees, fields, farms" as a negative prompt. While some of the backgrounds still have these details, they're less present across the four images than when I just use the prompt "a portrait of a purple cow, high definition digital art."
Use an image as part of the prompt
The Image box lets you upload an image to use as part of the prompt. It's incredibly powerful and allows you to control the composition, color, and other details of the image. Once you upload an image, you can set how strongly you want it to impact the generated art. Thirty-five percent is the default and works pretty well, though you can play around with it.
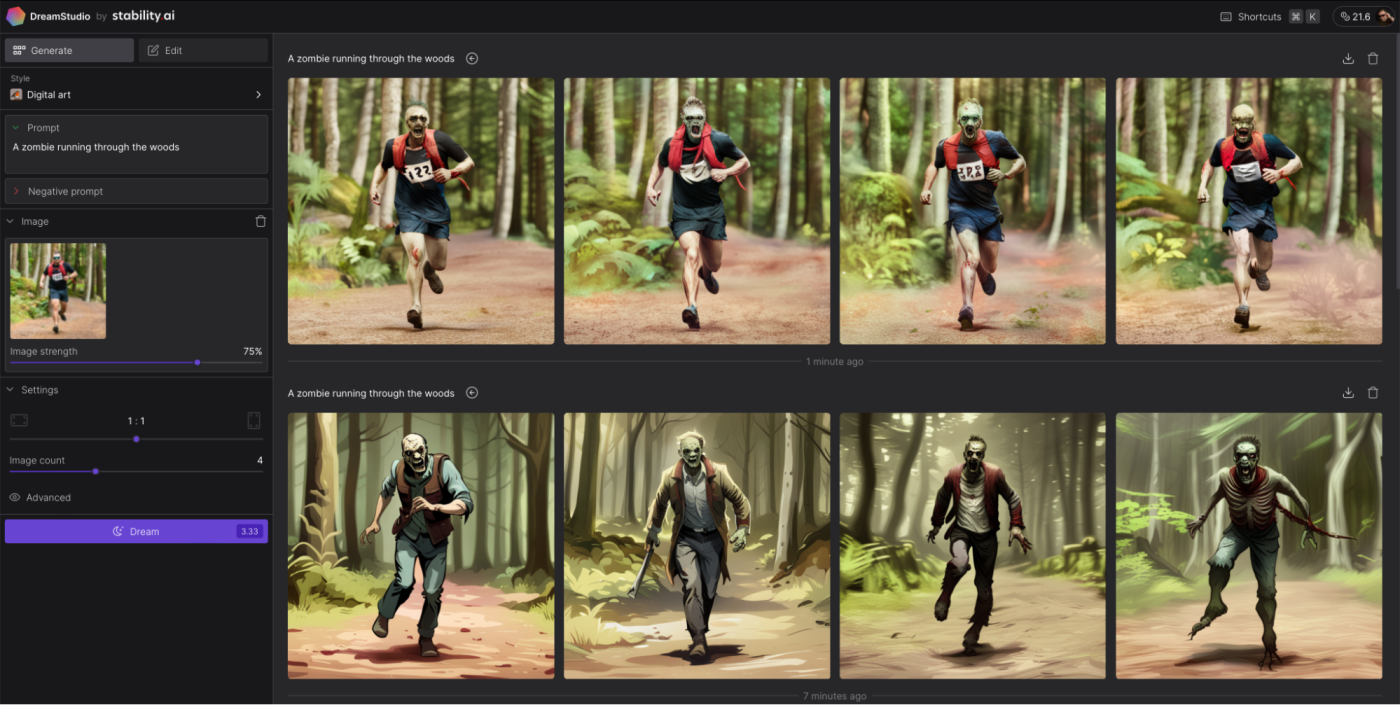
In the images above, I've used the prompt "a zombie running through the woods" along with a photo of me actually running through the woods. The bottom options had the image strength set to 35%, and the top options had it set to 70%. In both cases, you can see just how much of an impact the base image had on the overall look of things.
More Stable Diffusion image settings
Stable Diffusion has a few more settings you can play around with, though they all affect how many credits each generation costs.
Let's start with the two basic ones:
-
Aspect ratio: The default is 1:1, but you also can select 7:4, 3:2, 4:3, 5:4, 4:5, 3:4, 2:3, and 7:4 if you want a wider image.
-
Image count: You can generate anywhere between one and ten images for each prompt.
Under Advanced, you get four other options:
-
Prompt strength: This controls how strongly Stable Diffusion weights your prompt when it's generating images. It's a number between 1 and 30 (the default appears to be around 15). In the image above, you can see the prompt strength set to 1 (top) and 30 (bottom).
-
Generation steps: This controls how many diffusion steps the model takes. More is generally better, though you do get diminishing returns.
-
Seed: This controls the random seed used as the base of the image. It's a number between 1 and 4,294,967,295. If you use the same seed with the same settings, you'll get similar results each time.
-
Model: You can choose between three different versions of Stable Diffusion: 2.1, 2.1-768, and a preview of SDXL (the default).
While you won't often need to dive into these settings, they're a great way to understand what Stable Diffusion is actually doing when you give it a prompt.
How to edit images with Stable Diffusion

DreamStudio also supports inpainting and outpainting, where you use an AI art generator to change the details of an image or expand it beyond its borders. To inpaint or outpaint:
-
Select the Edit option at the top of the left sidebar.
-
Create a new image or import one from your computer.
-
Use the arrow tool to select an overlapping area, enter a prompt, and click Dream. You'll get four potential options for expanding your canvas.
-
Or use the eraser tool to delete something from an image, and then replace it using a prompt.
To be honest, DreamStudio's inpainting and outpainting tools feel less cohesive than DALL·E 2's—I find it doesn't blend new AI generations as well. But it's fun to play around with, and it showcases how AI image generators may well be used commercially over the next few years.
Going further with Stable Diffusion
DreamStudio is the fastest way to get started with Stable Diffusion, but it's far from the only way. If you like it, you should consider diving deeper and doing something like training your own model or installing it on your own computer, so you can generate as many images as you want—for free.
Stable Diffusion is getting better and better, but if you want to try something different, you should also check out DALL·E 2 and Midjourney, the two other leading AI image generators.
Related reading: